This cake was truly amazing! The birthday girl for whom I made it said it was the best cake she'd ever eaten. Naturally, I don't have pictures, but the aesthetics of baked goods continue to elude me, so that's probably all for the best. I started with my basic chocolate cake, then dressed it up! I found the mocha flavor to be mild but pleasant. You could certainly increase the amount of instant coffee, or use espresso powder for a more intense flavor.
Peppermint Mocha Cake
1 cup sugar
1 cup brown sugar
1-3/4 cups all-purpose flour
3/4 cup cocoa
1-1/2 teaspoons baking powder
1-1/2 teaspoons baking soda
1 teaspoon salt
2 eggs
1 cup buttermilk
1/2 cup vegetable oil
2 teaspoons vanilla extract
1 cup boiling coffee
Heat oven to 350°. Grease a 9 x 13 baking pan. In a
mixing bowl, combine dry ingredients. Add eggs, buttermilk, oil, and
vanilla; beat on medium speed until smooth. Stir in coffee. (Batter will
be thin.) Pour batter evenly into prepared pan. Bake 35-40 minutes, or
until a toothpick inserted near center comes out clean. Cool for about 30 minutes.
Meanwhile, whisk together:
1 packet (3.75 ounce) chocolate fudge pudding mix
2 cups cold milk
3 tablespoons instant coffee
(I mixed the coffee into the milk to dissolve, then added the pudding mix.)
Poke holes (using a wooden spoon handle) all over the cake. Pour the pudding slowly over the cake. Allow it to cool completely, then refrigerate for an hour or so.
Roughly chop up:
18 Hershey's Candy Cane Kisses
After the cake has cooled, sprinkle the kisses over the pudding layer.
Frost the cake with an 8 ounce tub of whipped topping.
Store in the refrigerator.
Wednesday, December 12, 2012
Saturday, November 24, 2012
What's Cooking?
So it turns out that cakes aren't the only thing I'll be baking over the next few months - we've got a bun in the oven! A friend of mine told me that now I'd have to change the name of the blog to Barefoot (and Pregnant!) in the Kitchen.
We are, of course, very excited about the new addition to our family and look forward to meeting him or her sometime in July.

We are, of course, very excited about the new addition to our family and look forward to meeting him or her sometime in July.

Thursday, November 15, 2012
Tomato Tortellini Soup
For dinner last night, I made a creamy, simple soup using tomato soup and tortellini. I don't often make meat-free meals, but this one is hearty enough that it works for us. I served it with this incredible Rosemary Olive Oil Bread that has become a family favorite.
Tomato Tortellini Soup
1 32-ounce carton tomato soup (I use Imagine brand)
2 cups chicken broth (or veggie broth)
1 cup half and half (or milk)
1 9-ounce package refrigerated cheese tortellini
1/4 teaspoon fresh ground pepper
1/2 teaspoon Italian seasoning
Feta or Parmesan cheese, to taste
In a large saucepan, combine the tomato soup, broth, half and half, and seasonings. Heat completely through, then stir in cheese if desired. I used a few tablespoons of feta. Meanwhile, in another pot, cook tortellini according to package directions, then drain and stir into soup. Serve immediately.
* Between the combination of ingredients, I found the soup didn't need any extra salt, but you might prefer a bit more.
* For a more intense tomato flavor you can add in a tablespoon of tomato paste.
* Because the Rosemary Olive Oil Bread is so flavorful, I didn't even use Italian seasoning in this batch of soup, and it was still delicious!
* I like the simplicity of this soup, but to stretch it further, cooked cubed or shredded chicken, cooked and crumbled Italian sausage, a can of canellini beans or a couple handfuls of raw spinach would be really great additions without adding to the cooking time.
Tuesday, November 13, 2012
Honey Vanilla Granola
My friend Leah is a creative cook with a delicious granola recipe! I've made it several times and I love having it on hand for snacking and adding to yogurt parfaits. I'm going to share with you the recipe as I generally make it, but as with most granola recipes it's extremely versatile. Use your imagination!
Honey Vanilla Granola
1/2 cup butter
1/2 cup honey
1 tsp vanilla extract
1/2 tsp maple extract
2 tsp cinnamon
dash salt
4 cups whole oats
3/4 cup additional add-ins (shredded coconut, wheat germ, flax seed, sunflower seeds)
Preheat oven to 325°. In small saucepan melt the butter and honey together. Stir in cinnamon, vanilla, maple extract and salt until thoroughly mixed. I like to bring the mixture to a boil for one minute to be sure it is thoroughly mixed, and to help it harden as it bakes. In separate bowl, stir together oats and any add-ins. Pour butter mixture over oats and mix well. Spread coated oats in a thin even layer on a greased cookie sheet or jelly roll pan. Bake for 9-10 minutes, remove from oven and stir thoroughly. Return to the oven and bake for an additional 8-10 minutes. The granola needs to be lightly golden. It will darken and harden as it cools. You may have to adjust baking times and temperatures -- if the granola is brown, it will have a burnt taste. (I usually bake mine for about 8 minutes each time because I don't like it to be too crunchy.)
 |
| These are all the ingredients I used in my last batch. |
1/2 cup butter
1/2 cup honey
1 tsp vanilla extract
1/2 tsp maple extract
2 tsp cinnamon
dash salt
4 cups whole oats
3/4 cup additional add-ins (shredded coconut, wheat germ, flax seed, sunflower seeds)
Preheat oven to 325°. In small saucepan melt the butter and honey together. Stir in cinnamon, vanilla, maple extract and salt until thoroughly mixed. I like to bring the mixture to a boil for one minute to be sure it is thoroughly mixed, and to help it harden as it bakes. In separate bowl, stir together oats and any add-ins. Pour butter mixture over oats and mix well. Spread coated oats in a thin even layer on a greased cookie sheet or jelly roll pan. Bake for 9-10 minutes, remove from oven and stir thoroughly. Return to the oven and bake for an additional 8-10 minutes. The granola needs to be lightly golden. It will darken and harden as it cools. You may have to adjust baking times and temperatures -- if the granola is brown, it will have a burnt taste. (I usually bake mine for about 8 minutes each time because I don't like it to be too crunchy.)
 |
| The finished product! Scrumptious. |
Monday, November 12, 2012
Cornbread to the Rescue!
The other day we weren't supposed to be home at dinner time, but our appointment got cancelled, leaving me with no dinner plans and a husband coming home in an hour! To make matters worse, going out was out of the question and it was Thursday - we get groceries on Friday. (I buy our food weekly, which means very little "stocked up". I had pantry staples like flour and condiments to work with.) After staring into the open fridge and pantry with the dull stare of a dairy cow, inspiration finally struck.
I took my favorite cornbread recipe and added about a cup each of cooked, shredded chicken and cheddar cheese. If I had had a jalapeño and whole kernel corn, I would totally have added that, too. Since I use bacon fat in place of some the shortening in my cornbread, the flavor was really terrific! I added the extras after mixing the batter and before the melted shortening/fat.
I was pleasantly surprised to find a couple of Honeycrisp apples in the fridge, too, so I sliced them up and served them. An odd combination, to be sure, but everyone in my family ate it up and asked for seconds. I do have to say, though, that I did have more to choose from than I normally would. Fresh fruit is almost always gone by Thursday night, I had just forgotten about those somehow.
Halfway through dinner, a friend texted and asked if she could come over for an hour or so. Knowing she was going to pick up fast food for her own dinner, I tentatively offered her some of ours. She agreed, and then was so glad she did - she loved it!
I have to say, one of my favorite things about cooking is handling these little challenges - it's like Iron Chef, Secret Ingredient: Shredded Chicken! Allez Cuisine!
Saturday, November 10, 2012
Caesar Dressing
A few months ago a sweet, crazy friend of mine had me and a couple other ladies over for dinner. She made a salad for us using a homemade Caesar dressing that was very tasty! Now, I'm aware that true Caesar includes such dubious ingredients as a raw egg yolk and anchovy, but ... yuck. So, this isn't "authentic", but it is really, really good! (I modified it a bit for my taste.)
Caesar Dressing
1/3 cup olive oil mayonnaise
2/3 cup plain Greek yogurt
1 T. lemon juice
1 tsp. Worcestershire sauce
1 clove garlic (minced)
1/4 tsp. salt
1/4 tsp. fresh ground black pepper
1/2 c. grated Parmesan cheese
1 T milk
Combine all ingredients in a Mason jar and shake 'em up. Or whisk the ingredients together in a small bowl. That's it!
Wednesday, October 3, 2012
Peanut Butter Surprise
Our Little One would like me to share this delightful recipe with you. It was the highlight of her day yesterday.
Peanut Butter Surprise
1. Wait until Mommy thinks you're with Daddy, and Daddy thinks you are with Mommy.
2. Working quickly and quietly, locate the full jar of peanut butter.
3. Hide in a nearby cabinet with the jar.
4. Using both hands, carefully dig out scoops of peanut butter and squeeze it between your fingers.
5. Lick your hands.
6. If you have time and want to get fancy, be sure to spread some of the peanut butter in an artistic pattern on the cabinet wall!
7. When you hear Mommy say, "Where's (insert name here)?", shove the jar behind your back and pretend it never happened.
If there's a peanut allergy in your family, this recipe also works well with applesauce or any flavor of yogurt! The chef recommends that you try those while hiding under the table.
Friday, September 28, 2012
Two Ingredient Pizza Dough
I really didn't think this two ingredient dough would actually work! I pinned the idea on Pinterest a while back and tonight I was desperate enough to give it a shot. It worked beautifully! Basically you just mix equal amounts of Greek yogurt and self-rising flour - for one pizza crust, I used 1 cup flour to 1 cup yogurt. You'll need additional flour in order to knead the mixture into a soft dough, but that's it. Easy as pie.
I topped mine with a mixture of salsa and barbecue sauce, shredded cheeses, and shredded chicken. Everyone loved it!
I topped mine with a mixture of salsa and barbecue sauce, shredded cheeses, and shredded chicken. Everyone loved it!
Tuesday, September 4, 2012
Yogurt Parfaits
Sometimes, well, a lot of the times, the extra effort is definitely worth it.
(Rambling Side Note: It makes me giggle when someone misspells 'definitely' to look like 'defiantly'. I imagine they have really strong feelings about the subject and would fight you for it. "I defiantly think Star Trek is better than Star Wars." or "David Tennant is defiantly a better Doctor than Christopher Eccleston." Anyhoo ...)
When it comes to homemade, I've told you before how I feel. It's amazing how easy some things are to do, and how much cheaper they are to make from scratch.
Homemade yogurt is a good example. For the cost of a gallon of milk ($3 for me) and some cheesecloth, you can make it at home and know exactly what's in it! You can sweeten/flavor the whole batch when it's done, or do it by the serving. I like to keep it plain and flavor it by the serving so I can use the plain in place of sour cream or mayonnaise in recipes. Out of that gallon of milk, I got 3 pint jars of Greek yogurt, plus a bit more. I also got 2 quart jars (plus some) of whey. Whey is great to use in smoothies, and in place of liquid called for in yeast breads. You can also check this link for lots more uses. For the name brand of Greek yogurt (tastes better than store brand) it usually costs between $3 and $5, depending on sales and brand, for the 16 ounce container. Cheaper and better for you - I can get behind that!
This morning I made Honey-Vanilla Granola, from my friend Leah's recipe. It is so easy and delicious. It's a big batch, but it's pretty tasty so I'm not sure it's going to last long! Start to finish for me? 25 minutes. (15 of that, hands-off.)
I also threw together a strawberry sauce. I've been taking advantage of the strawberry sales this summer and buying them up. I wash, trim, and freeze them so I can use them throughout the year. The sauce was simply strawberries, a touch of sugar, and almond extract simmered together. I cooled the mixture and popped it in the blender to get it smooth.
Later, I'll layer the yogurt, granola and strawberry sauce to make parfaits for the kiddos. Purchased at the store, the parfaits are easily $1.50 apiece, and full of unpronounceable ingredients.

Thursday, August 23, 2012
Ham and Cheese Cups
I've seen recipes similar to this one over the years and they've intrigued me. Mostly, though, they involve simply cracking an egg into a muffin cup lined with ham or bacon and sometimes topping it with cheese. I am NOT a fan of the whole "runny yolk" deal, though, and I don't like eating the white and yolk separately like that unless it's a hard-boiled egg. Even then I have to have a taste of each with every bite! I'm weird like that. (But when it comes to candy bars like Kit-Kat, Reese's Cups, or Twix I eat each layer separately. Pretty sure I read an article addressing that in Psychiatry Monthly.) At any rate, the Ham and Cheese Cups I made today were fabulous! I made only 6 since I was doing them for my own lunch - plus, I happened to have 6 slices of ham leftover from Sunday night's deli sandwiches. I had a filling lunch and I'll have a nice breakfast in the morning, too!

Ham and Cheese Cups
12 slices deli ham
8 eggs
2 tablespoons Greek yogurt or sour cream
1 cup shredded cheddar cheese
2 small potatoes, washed and peeled
1 tablespoon butter
salt and pepper
Spray 12 muffin cups with non-stick cooking spray. Line with one slice of ham. In a large measuring cup or a bowl with a spout for easy pouring, crack the eggs and whisk them together with the yogurt and salt and pepper to taste.

On a paper towel, shred the potatoes. Use the paper towel to wring out some of the moisture in the potatoes. Place shredded potato in a small microwaveable bowl and sprinkle with salt and pepper. Add the butter; microwave for about 1 minute, stirring halfway through. Divide the potato between the muffin cups and top with cheese. Pour the egg mixture evenly over each cup.


Bake at 350° for 16-20 minutes, until tops are nicely rounded and a toothpick inserted into the center comes out clean.
If I'd had spinach or broccoli or zucchini, I would have used that instead of, or in addition to, the potato. Either way these were delicious and I'll be making them again for sure!
Monday, August 6, 2012
Sunday Night Review 8/5/2012
Last night, for our Sunday night crowd, I made a big batch of beef burritos. I ended up with 20 and every one of them got eaten! There was actually one lone burrito left in the pan when one of our college guys came from UGA Redcoat Band practice - late and hungry! He gladly cleaned the pan out for me. I served them with sour cream, lettuce, diced tomatoes, and salsa, plus tortilla chips. For the salsa, I used jarred, medium heat and blended in a bit of lime juice and cilantro. For dessert, I made Nutella Doughnuts. They were okay, but really need to be made and eaten on the same day. (I baked them Saturday night and filled them Sunday afternoon.)
Though when I make Burrito Casserole for the family I use this basic recipe, I have to stretch it for the crowd on Sundays. This time I used 2 pounds of (lean) beef, onion, garlic, chili peppers (from a friend's garden), chili powder, cumin, pepper, salt, cilantro, vegetarian refried beans, and a can of diced tomatoes with green chilies (Ro-Tel). Served over rice with the above-mentioned toppings, they made a pretty hearty meal!
Though when I make Burrito Casserole for the family I use this basic recipe, I have to stretch it for the crowd on Sundays. This time I used 2 pounds of (lean) beef, onion, garlic, chili peppers (from a friend's garden), chili powder, cumin, pepper, salt, cilantro, vegetarian refried beans, and a can of diced tomatoes with green chilies (Ro-Tel). Served over rice with the above-mentioned toppings, they made a pretty hearty meal!
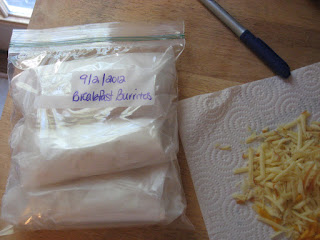
 |
| Rice in the pans, cilantro, enchilada sauce, beef feeling, cheddar and pepper-jack cheese, and flour tortillas. |
Thursday, August 2, 2012
Breakfast Burritos
I love breakfast food! I like it best brought to me on a tray while I sip coffee in bed, but since that's never happened ... I'll take what I can get. These breakfast burritos are really wonderful. You can eat them right away, or freeze them for future use. They can be microwaved straight from the freezer! One minute and your breakfast is served. This recipe is more on the lines of assembly instructions, since you can use whatever your family likes to stuff them.
Breakfast Burritos
First, scramble some eggs! I use this basic recipe, but you make them how you like 'em:
You'll need cheese, of course!
From this point, you can use sauteed peppers or onions; cooked bacon, sausage or ham; diced green onions; fresh herbs; anything you like in a burrito!
I used some sausage I got from my granny - It's SO good! I didn't have very much left, sadly, so I limited myself to 3 pieces per burrito.

Starting with the cheese, then eggs, layer your ingredients in the middle of the tortilla (I cup it in my hand to keep them contained), then fold them up!


Now they're ready to eat! Or, to prepare them for the freezer, wrap them in wax paper, then in aluminum foil.

If you feel sure your family will eat them fairly quickly (within a month), skip the aluminum foil and put them in freezer bags.
To heat them, remove the foil but leave on the wax paper. Place on a plate in the microwave, and heat for 30 seconds. Flip it over, and heat for 30 more seconds. Depending on your appliance, it will probably be done at this point. If the wattage is lower (850 or less) it will need another 30-60 seconds.
Breakfast Burritos
First, scramble some eggs! I use this basic recipe, but you make them how you like 'em:
 |
| I use about 1 egg per burrito. Five in this case. A dollop of sour cream, a splash of milk, salt and pepper. |
 |
| Whisk it together really well! Then cook 'em. |
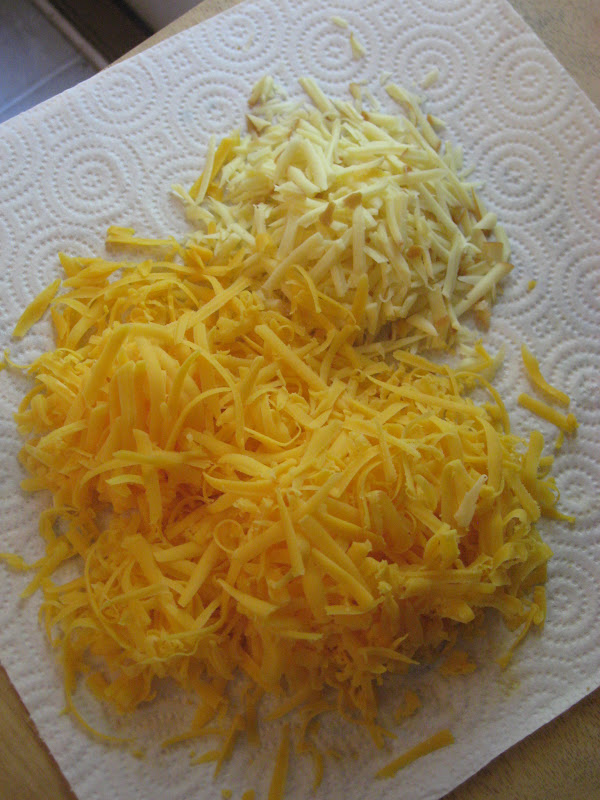 |
| This is a mixture of gouda and sharp cheddar. I didn't use all of this - I was shredding for our dinner, too. |
I used some sausage I got from my granny - It's SO good! I didn't have very much left, sadly, so I limited myself to 3 pieces per burrito.

Starting with the cheese, then eggs, layer your ingredients in the middle of the tortilla (I cup it in my hand to keep them contained), then fold them up!


Now they're ready to eat! Or, to prepare them for the freezer, wrap them in wax paper, then in aluminum foil.

If you feel sure your family will eat them fairly quickly (within a month), skip the aluminum foil and put them in freezer bags.

To heat them, remove the foil but leave on the wax paper. Place on a plate in the microwave, and heat for 30 seconds. Flip it over, and heat for 30 more seconds. Depending on your appliance, it will probably be done at this point. If the wattage is lower (850 or less) it will need another 30-60 seconds.
Tuesday, July 31, 2012
Parmesan Chicken
Sometimes my recipes come from being creative with the limited food in my fridge and pantry. Sometimes I see a recipe and think, "I can do better than that!". Sometimes I take a good recipe and challenge myself to make it better. This chicken recipe is in that third category! The original looked really good, and I intended to make it as-is, but naturally, I put my own twist on it.
I bought boneless skinless chicken breasts on sale for $1.77 per pound at Kroger on Friday. Since they were pretty big, I decided to cut them in half, making two cutlets out of each breast. I placed 4 cutlets in each quart-sized freezer bag, then poured the marinade over them. One bag went in the fridge for dinner and one bag went into the freezer for another night. When I mixed the bread crumbs and Parmesan, I used half for dinner and put the other half in a freezer bag, in the freezer to use with the other chicken. Two meals, one prep time! This recipe is for the full amount of chicken, and you can divide it like I did if you don't need 8 pieces of chicken.
Parmesan Chicken
4 large chicken breasts
2 tablespoons chopped fresh herbs, or 2 teaspoons dried herbs (I used parsley, oregano and rosemary)
2 garlic cloves, chopped
1/4 teaspoon salt
1/4 teaspoon pepper
2/3 cup olive oil
2/3 cup fresh bread crumbs (I used whole wheat bread in the food processor)
2/3 cup grated Parmesan
In a small sauce pan, combine the herbs, garlic, olive oil, salt and pepper. Heat gently on low for 3-4 minutes. You just want to get the flavors infused into the oil, you're not cooking it really. Remove from heat. Using a sharp knife, cut the chicken breasts cross-wise into cutlets. (This works best if the chicken is partially frozen.) Place the chicken in a resealable bag and pour the marinade over it. Allow the chicken to marinate in the fridge for 6-8 hours, or overnight.
Remove the chicken from the fridge, and preheat the oven to 375°. In a shallow dish, combine the bread crumbs and Parmesan. Press both sides of each cutlet into the crumb mixture and place in a baking dish. Bake for 15 minutes, flip them over, and bake for 10 more minutes until the juices run clear. Don't overbake it!
Monday, July 23, 2012
Spaghetti and Meatball Cupcakes
When I saw a picture on Pinterest of cupcakes topped with spaghetti and meatballs, I knew I'd be making them soon! I love making cupcakes for when I need a dessert for a crowd. It's fun to fix them up in different ways. As usual, I used a boxed mix for the cakes themselves, though I always doctor it up a bit. I made cream cheese frosting to top the cakes.
You can see here I've already piped on the "noodles". After applying a thin "base coat" of frosting on the cakes, I tinted the rest with a touch of yellow food coloring, and added a bit of cinnamon to give it a slightly browner tinge, plus it adds flecks.

Now for the "marinara sauce" - strawberry jam.

The "meatballs" - Whoppers, of course! And no Italian dish is quite complete without a little "Parmesan cheese" - grated white chocolate.


Saturday, July 21, 2012
Apple-Bacon Pork Tenderloin
Inspired by a recipe I found on Pinterest, last night I made a pork tenderloin. In the end, the only elements of the recipe that I actually used were the idea of wrapping the tenderloin in bacon and using apple to flavor it. It turned out even better than I expected! One element you shouldn't skimp on is the juice. We love the natural apple juice (Mott's brand) because the apple flavor is so strong. It really does taste like fresh-pressed apples. You could use cider or spiced cider, too.
Apple-Bacon Pork Tenderloin
1 cup apple juice
2 tablespoons apple butter
1 teaspoon fresh thyme
1/4 teaspoon pepper
1/4 teaspoon salt
1 tablespoon Dijon mustard
4 slices bacon
pork tenderloin
In a small bowl, whisk together the first 6 ingredients. Marinate the tenderloin in the mixture for at least 4 hours (you could do it all day, or overnight, too). In a large skillet, or in the oven, cook bacon until some of the fat is rendered but it's still limp. Remove the tenderloin from the marinade and wrap the bacon around it. Place on a baking sheet or in a dish. Bake at 375° 20-25 minutes.
Thursday, July 19, 2012
Barbecue Cheddar Meatballs
Typical Thursday - I was scraping the bottom of the barrel, food-wise. Normally I have a meal planned out, but this week I just happened not to. I thawed a package of ground beef and hoped inspiration would strike. Thankfully, it did! Working with limited resources, I decided to make Barbecue Cheddar Meatballs. Little One and Handsome had seconds, and apparently they were good enough for The Boy to have seconds, too! He speared a meatball with his fork and declared, "Now you must face your demise!"
Barbecue Cheddar Meatballs
1-1/2 pounds lean ground beef
1/4 cup barbecue sauce (I used Spicy Honey from Kraft)
1/2 cup shredded sharp cheddar cheese
1/4 teaspoon black pepper
1/8 teaspoon salt
1 egg
1/3 cup bread crumbs
1 cup barbecue sauce
1/2 cup salsa
Bring a large skillet up to medium to medium-high heat. In a bowl, mix together the first 7 ingredients. Form tablespoonfuls into meatballs. Saute in skillet until browned on all sides. Reduce heat to low; stir in BBQ sauce and salsa. Cover and simmer for 8-10 minutes, until cooked through, stirring occasionally.
These would have been great with some mashed potatoes, but we're out of milk ... So, I served them with Green Beans, Carrot Zucchini Fritters, and corn.
Tuesday, July 17, 2012
Chicken Cordon Bleu Casserole
My favorite main dish of all time would have to be Chicken Cordon Bleu. I just love the combination of flavors! Sadly, no one else in my family actually likes ham, so I don't get to have it very often. I came up with this recipe recently, though, when I needed a meal to take to a friend who was having surgery. One of these days I'll make it for my family and hope for the best!
Chicken Cordon Bleu Casserole
2 cups shredded/cubed cooked chicken
8 ounces uncooked pasta (rotini, shells, penne)
1 (10-3/4 oz) can cream of chicken soup
8 ounces sour cream
1 cup cubed ham
2 cups shredded Swiss cheese
salt and pepper
1 tablespoon fresh thyme
1/2 cup Italian bread crumbs
2 tablespoons Parmesan cheese
2 tablespoons butter, melted
Cook pasta according to package directions; drain and place in large bowl. Mix in chicken, soup, sour cream, ham, thyme and cheese. Salt and pepper as you like. Pour into a greased 9-inch square baking dish. In a small bowl, mix together the bread crumbs, Parmesan, and butter. Sprinkle over the casserole. Bake at 350 for 25-30 minutes, until bubbly and topping is lightly browned.
This recipe is a variation of my Chicken Ranch Casserole, which is one of my most often requested recipes.
Monday, July 16, 2012
Peach Cobbler
Recently I needed an easy, cheap, tasty dessert to share with a couple who'd had a baby. Baking things from scratch is typically cheaper, but cakes are not my favorite thing to make. They're so unpredictable! Anyway, in this case I decided to make a peach cobbler. There are a lot of different ways to make cobbler - this is just one of the easiest.
Peach Cobbler
2 cups all-purpose flour
2 cups sugar
2 tablespoons baking powder
2 cups milk
1/2 cup (1 stick) butter or margarine
1 teaspoon cinnamon
3 cups chopped peaches
1/2 teaspoon maple extract
Preheat oven to 350°. Melt butter in a 9 x 13 baking dish. Mix together flour, sugar, baking powder and milk until smooth. Pour over butter. In a separate bowl, stir together peaches, cinnamon and extract. Sprinkle the fruit over the batter in the pan. Bake for 45-50 minutes, or until peaches are tender and crust is golden brown. Serve warm!
(As you can see from the pictures, I used a smaller, square pan. I just halved the ingredients.)
Peach Cobbler
2 cups all-purpose flour
2 cups sugar
2 tablespoons baking powder
2 cups milk
1/2 cup (1 stick) butter or margarine
1 teaspoon cinnamon
3 cups chopped peaches
1/2 teaspoon maple extract
Preheat oven to 350°. Melt butter in a 9 x 13 baking dish. Mix together flour, sugar, baking powder and milk until smooth. Pour over butter. In a separate bowl, stir together peaches, cinnamon and extract. Sprinkle the fruit over the batter in the pan. Bake for 45-50 minutes, or until peaches are tender and crust is golden brown. Serve warm!
 |
| Before |
 |
| After |
(As you can see from the pictures, I used a smaller, square pan. I just halved the ingredients.)
Saturday, July 14, 2012
Barefoot In The Kitchen Podcast #1
Despite the stereotype of our parents' generation being completely inept at computers, my mom is a lot more technologically advanced than I am! A couple of weeks ago, she asked me if I'd be interested in doing a video presentation of one of my recipes. She had taken a class where she learned about making podcasts and she wanted to try out her new skills. I readily agreed! Here is our first attempt at a demonstration video, using the recipe for Lasagna Rolls that I featured a few weeks ago.
Thursday, July 12, 2012
Modern Times
It turns out that going to the gym is good for something! I found a great new recipe in Southern Living while I tortured myself on the elliptical machine. Hey, remember back in the old days when, if you found a recipe in a fifteen year old Southern Living while waiting for the dentist, you had to scrounge around in your purse for a quill and ink pot, and then you'd painstakingly scribe the entire recipe in illegible shorthand on a gas receipt and two gum wrappers, one of which you'd promptly lose? Well, I'm glad to say times have changed! I just waited until I got home and went to Southern Living's website and did a quick search for the recipe, Roasted Brown-Butter Pecans with Rosemary. (Is there any entity in the world that uses longer recipe names than our beloved SL?)
I made a small batch yesterday, because I wasn't sure I'd like them - I don't tend to like roasted nuts because they taste burnt to me no matter how carefully they're done. I'm pleased to say this recipe is perfectly lovely! A nice mix of salty/sweet, and the rosemary is a nice touch without being overpowering. It also helps to have in-laws with pecan trees, so you can get really fresh, perfect pecans!
I made a small batch yesterday, because I wasn't sure I'd like them - I don't tend to like roasted nuts because they taste burnt to me no matter how carefully they're done. I'm pleased to say this recipe is perfectly lovely! A nice mix of salty/sweet, and the rosemary is a nice touch without being overpowering. It also helps to have in-laws with pecan trees, so you can get really fresh, perfect pecans!
Wednesday, July 11, 2012
Barbecued Chicken Legs
Last Friday I was in the produce department of Kroger when a thought hit me: I hadn't decided what to make for our college people on Sunday night! After some serious brainstorming and a check in the meat department for sales, I decided on trying my hand at barbecued chicken legs. I ended up getting 15 drumsticks for about $4.50! I decided to make my own barbecue sauce with whatever I had on hand. This recipe will work for any amount of chicken, though.
Barbecued Chicken Legs
chicken legs
lemon-pepper seasoning
garlic salt
Remove the skin from the drumsticks. This is the most time consuming part of the process, and many stores sell them already skinned - especially during grilling season. Lay the legs out on a foil-lined cookie sheet. Sprinkle them lightly with the two seasonings, flip 'em over and season that side, too. Roast them in the oven at 375° for 30 minutes, turn, roast 15 minutes more. During the last 15 minutes, baste them occasionally with the barbecue sauce. Serve with more sauce on the side for dipping.
Red-Eye BBQ Sauce
1 cup brewed coffee
1/2 cup salsa
1/2 cup ketchup
1/3 cup honey
1/3 cup apple-cider vinegar
1/4 cup soy sauce
1/4 teaspoon black pepper
Combine all in a small saucepan. Bring to a boil; reduce heat and simmer for 30-35 minutes (while chicken bakes). Store leftover sauce in the refrigerator.
Since I was feeding a crowd and we eat after the evening church service, I elected to finish these off in the slow cooker. After the roasting process, without basting them, I put the drumsticks in my slow cooker insert and poured the completed Red-Eye BBQ Sauce over them. The insert went into the fridge until the next day, when I set the slow cooker to low before going to church that evening. They heated for about 3 hours, which was perfect! Enough to heat them through, but not to cook them any further.

Tuesday, July 10, 2012
Strawberry Shortcake
I wasn't feeling 100% this weekend, so I took the easy route for dessert Sunday night. I usually make my own cake and whipped cream for Strawberry Shortcake, but I sent Handsome to the store instead this time!
Strawberry Shortcake
16 ounces fresh strawberries
1 small orange
2 tablespoons powdered sugar
Wash and hull strawberries; slice and place in a small bowl. Zest and juice the orange; add those to the strawberries. Stir in the powdered sugar. You may not need the full amount of sugar, if any at all! The sugar does help pull out the juices, though, which is optimal for strawberry shortcake.
For the super-easy version of this dessert, just use storebought:
dessert shells
whipped cream (frozen and thawed, or the kind in the can)
Then you simply layer the shells, berries and cream.
For a simple way to make your own whipped cream, check out my Cinnamon Cream Fruit Dip. For a plain version just use powdered instead of brown sugar, and omit the cinnamon.
Monday, July 9, 2012
Baked Potato Casserole
I've seen lots of different versions of this, but when I made it this time I didn't bother to use a recipe. I just tossed things together until they looked good! Apparently it worked because our folks cleaned out the pans and I got lots of positive feedback! I'm giving you the recipe as I made it, but of course you can cut it in half for a more reasonable amount.
Baked Potato Casserole
3 pounds red potatoes
10 slices bacon, cooked and crumbled - reserve 1/4 cup drippings
3 green onions, sliced
2 cups shredded cheddar cheese
1 cup sour cream
1/2 cup butter, melted
salt and pepper
Bake the potatoes until tender. (I just scrub them and pop them in the oven. They took about an hour at 400°.)
When the potatoes are cool enough to work with, cube them into bite-size pieces and divided them between two 9 x 13 pans. Sprinkle them with salt and pepper, onions, bacon, and cheese. Pour on the butter, bacon grease, and sour cream (divide it between the two pans). Carefully stir the potatoes until well coated. Cover with aluminum foil and bake at 350° for 20 minutes. Remove foil and bake for another 10 minutes. I served them with more sour cream on the side for those that wanted it.
If you want to make this dish in shifts, you can bake the potatoes the day before and store them in the fridge whole. I wouldn't keep them longer than 24 hours like that, though, as the texture will not be as good.
Thursday, July 5, 2012
Link Love
I love finding new recipes and I especially love it when they're good enough to add to our list of favorites. I've made a few of those over the last couple of weeks.
Oreo Cake - This was really easy and a big hit!
Sour Cream Chicken - My mom made this in the oven when I was a kid, with the addition of dried beef on the bottom. I thought the recipe was good, but a bit bland. I'll have to play with it to boost the flavor.
Watermelon Sorbet - Handsome requested a watermelon last week, but he's the only one that really likes it. I cut up half of it for eating and for use in this sorbet, then took the other half to a Fourth of July party.
Strawberry Cheesecake Ice Cream - I made this for a church ice cream social a couple of weeks ago. It is delicious and a great alternative for if you don't have an ice cream maker.
Sunday, July 1, 2012
How to Really Help Your Hamburger
When Handsome and I first got married, I made a lot of packaged foods and our pantry was full of cans and boxes. As I grew more confident in the kitchen I made more and more things from scratch using fresh ingredients. Especially during my first pregnancy I determined to increase the nutritional value of our meals with whole grains and more fresh vegetables. Now I can't remember the last time I cracked open a box of Hamburger Helper! Here's my nostalgic homage to those newlywed days.
Ground Beef Stroganoff
2 tablespoons butter
1 cup diced carrots
1/4 cup diced onion
1 garlic clove, minced 1/2 pound 93% lean ground beef
1/4 tsp salt
1/4 tsp pepper
1/2 teaspoon paprika
3 tablespoons flour
1 carton (32 ounces) reduced-sodium beef broth
1 cup frozen peas
8 ounces thin egg noodles
2 tablespoons plain Greek yogurt (or reduced-fat sour cream)
In a large skillet, saute the carrots, onion, and garlic in the butter for 3-4 minutes. Add the ground beef and cook and stir until the meat is fully browned. Sprinkle in the salt, pepper, paprika and flour. Cook and stir for 2-3 minutes. Pour in the beef broth, stirring until the flour is fully incorporated and sauce is smooth. Stir in the noodles and peas. Bring to a boil; reduce to a simmer and cook for 8-10 minutes. Remove from heat and stir in yogurt.
Wednesday, June 27, 2012
Homemade Croutons

I personally don't love croutons, because I'm not a fan of crunchy bread in any form. I remember that during my childhood time in Germany I would poke a hole in my kaiser roll and dig out the soft center, leaving the shell, which was totally not worth eating, in my opinion. Anyway, I do actually like homemade croutons, because I keep them a little chewy. I eat two or three and I'm good for the next six months.
Handsome, of course, loves them and will steal them off the tray or out of the pan! Fortunately, they're easy to make, and it's a method rather than a recipe.
Homemade Croutons
Start with "day-old" bread. That just means you don't want really fresh bread, because it's too soft to cut easily, and it won't crisp up into croutons as well. You can use any kind of bakery whole bread loaves, though I like Italian or French baguettes. Multigrain, wheat, pumpernickel, sourdough or white all work well.
Seasonings - I like a mixture of garlic powder, paprika, salt, and pepper. The amounts will vary according to your taste and how many croutons you're making.
Olive oil - you'll want to moisten the bread, but not soak it.
Cut your bread into bite-size pieces.
If you're making a lot of croutons, line a baking sheet with foil. Spread out the bread cubes and drizzle with olive oil, tossing to coat. Sprinkle with seasonings, and continue to toss until evenly coated. Bake at 375° for 10-15 minutes, stirring occasionally. Watch them carefully, and remember that they'll firm up a bit while cooling.
If you just need a small batch, heat a couple of tablespoons of olive oil in a skillet. Add a small amount of seasonings. Add the bread cubes and toss to coat. Drizzle in more olive oil and seasonings if needed. Stir occasionally until the croutons are golden brown. This should only take 5-6 minutes.
Tuesday, June 26, 2012
Lasagna Rolls
I love lasagna, for the same reason Handsome doesn't - lots of gooey, creamy cheese! The recipe I'm sharing with you today is one that has lots of cheesy goodness, so I naturally don't get to make it very often. Like most recipes, it's adaptable. I tend to make it meat-free, though diced/shredded cooked chicken would be great inside the rolls, or cooked ground beef/Italian sausage can be added to the marinara sauce. Another variation I love that the family doesn't is chopped spinach in the filling. There are a few steps to this, but it comes together quickly.
**Update** You can watch a podcast of me making the dish step-by-step HERE. My mother recorded it as part of a project when she was earning her master's degree.
Lasagna Rolls
8 lasagna noodles, cooked al dente (Try this cool method!)
15 ounces ricotta cheese
2 cups shredded mozzarella, divided
1/4 cup chopped parsley
1 egg
1/4 cup Parmesan cheese
2 tablespoons butter
1 garlic clove, minced
2 tablespoons flour
2 cups milk
1/4 cup Parmesan cheese
2 cups marinara sauce
For the filling: In a bowl, combine the ricotta, 1 cup mozzarella, parsley, egg, and 1/4 cup Parmesan. Salt and pepper to your liking. Set aside.
To make the bechamel sauce: In a small skillet, melt the butter and stir in garlic. Saute for one minute. Sprinkle in flour, whisking for 3-4 minutes. Slowly whisk in milk. When thickened, whisk in Parmesan. Salt and pepper to your liking. Pour the sauce into a greased 9 x 13 baking dish.
Lay the lasagna noodles out a couple at a time on a clean surface. Spread about 2 tablespoons of the ricotta mixture onto each noodle, leaving room at each end. Gently roll them up and place seam-side down in the bechamel sauce.


Top the lasagna rolls with the marinara and the remaining mozzarella. Cover and bake at 350° for 20 minutes. Remove cover and bake for 10 more minutes, until cheese is bubbly.
**Update** You can watch a podcast of me making the dish step-by-step HERE. My mother recorded it as part of a project when she was earning her master's degree.
 |
| Lasagna Rolls, fresh from the oven! |
Lasagna Rolls
8 lasagna noodles, cooked al dente (Try this cool method!)
15 ounces ricotta cheese
2 cups shredded mozzarella, divided
1/4 cup chopped parsley
1 egg
1/4 cup Parmesan cheese
2 tablespoons butter
1 garlic clove, minced
2 tablespoons flour
2 cups milk
1/4 cup Parmesan cheese
2 cups marinara sauce
For the filling: In a bowl, combine the ricotta, 1 cup mozzarella, parsley, egg, and 1/4 cup Parmesan. Salt and pepper to your liking. Set aside.
To make the bechamel sauce: In a small skillet, melt the butter and stir in garlic. Saute for one minute. Sprinkle in flour, whisking for 3-4 minutes. Slowly whisk in milk. When thickened, whisk in Parmesan. Salt and pepper to your liking. Pour the sauce into a greased 9 x 13 baking dish.
Lay the lasagna noodles out a couple at a time on a clean surface. Spread about 2 tablespoons of the ricotta mixture onto each noodle, leaving room at each end. Gently roll them up and place seam-side down in the bechamel sauce.


Top the lasagna rolls with the marinara and the remaining mozzarella. Cover and bake at 350° for 20 minutes. Remove cover and bake for 10 more minutes, until cheese is bubbly.
 |
| Ready for the oven! |
Friday, June 22, 2012
Caramel Apple Cheesecake Bars
I am always on the lookout for delicious apple and cinnamon recipes since that's Handsome's favorite flavor combination. When I found Caramel Apple Cheesecake Bars, I knew I had a winner! I adapted quite a bit of the recipe to suit my style of cooking and our tastes (I found the "as-is" recipe good, but a touch bland).
I pulse the ingredients for the crust in the food processor, using cold butter.
I use a touch of maple extract in the filling, and low-fat cream cheese.
I add a touch of maple extract to the apple mixture, too.
I pulse the streusel ingredients in the same food processor, using old-fashioned oats, cinnamon, and a handful of pecans.
I do NOT line the pan with foil. I did the first time and it was disastrous. I just spray the pan with non-stick cooking spray and it works beautifully.
These bars are definitely highly recommended, though! I think the addition of maple and pecans and more cinnamon really kick them into high gear, flavor-wise. Y'all enjoy!
Thursday, June 21, 2012
Barefoot in the Garden
So my sweetie pie and I decided to try our hands at gardening this year. A few things haven't worked out, but considering I have a brown thumb I think we're doing pretty well! Here's a sneak peek at what I'm making for dinner tonight:
 Those babies are going to be delicious mashed potatoes by the time I'm through with them. I dug them up out of the garden this morning.
Here's the fruit of someone else's garden that I received last week:
 This baby is going to be 17 loaves of zucchini bread by the time I'm through with it.

Here's the fruit of someone else's garden that I received last week:

Tuesday, June 19, 2012
The Flavor of Spring
Just as cinnamon and apples make me think of fall weather, there's something about the combination of fruit and citrus that always reminds me of spring. I have several stand-by recipes that I love to use when I get the craving for spring!
Strawberry Scones with Lemon Glaze - These are incredible! The scones are tender and filled with strawberry chunks, and the glaze adds the perfect amount of tartness. I use lemon zest in the glaze, in addition to the juice.
Orange-Blueberry Muffins - The recipe actually calls for lemon, which I'm sure would be great, but I made these with orange zest and juice and they were delicious! The glaze really sets these apart.
Smooth Strawberry Soup - Words cannot express the yumminess of this soup! It's so ... the flavor! ... sigh ... Who knew the combination of lemon, orange, apple and strawberry would be so divine?
Strawberry Limeade Punch - This is my own recipe, inspired by Sonic's Strawberry Limeade. It's the perfect summer punch!
 |
| Picking strawberries last spring. |
Monday, May 28, 2012
Sunday Night Pizza
Last night I made a few homemade pizzas for our crew.
 On the left is BBQ Bacon Cheeseburger (BBQ sauce, beef, bacon, colby-jack, mozzarella); in the middle is Spaghetti and Meatball (marinara, angel hair pasta, meatballs, mozzarella, Parmesan); and on the right is Supreme (marinara, mushroom, onion, green pepper, ham, Italian sausage, pepperoni, colby-jack, mozzarella).
For dessert we had a crowd favorite - Tiramisu!

 |
| Our Oldest Girl made beautifully illustrated signs for the pizzas so people would know what was on each one. |
Monday, May 21, 2012
Beef Pot Pie
This feels like a cheat recipe because it's really just a combination of another couple of recipes. It's what I served to our Sunday night crowd last night, and judging by the comments and the fact that there was only one serving left over ... they loved it! Technically, I used a venison roast, but a beef chuck roast would work just as well. If I were making this for my family, I would probably use leftovers from a roast, but considering the amount of people I cooked for last night I made the roast specifically for the purpose of pot pie.
You'll start with a pot roast: Sunday Pot Roast
Chop the leftover roast into bite-size pieces and stir it back into the gravy; set aside.
1 cup diced potatoes
1 cup diced carrots
1/2 cup chopped green beans or peas
2 cups beef broth
2 cups water
1/2 can whole kernel corn
1 tablespoon chopped rosemary
1/2 teaspoon salt
1/4 teaspoon pepper
Cook the potatoes and carrots in the beef broth/water until tender, about 10-12 minutes. Add in the green beans or peas in the last 2-3 minutes of cooking time. Drain the broth, reserving about a cup to add into the gravy. Combine the vegetables, reserved broth, corn, beef and gravy, and seasonings. Transfer to a greased 9x13 baking pan. Mix together topping ingredients and spread over the top.
1 cup melted butter
1 cup buttermilk
2 cups self-rising flour
Bake at 375° for 35-40 minutes, or until the topping is golden brown.
The good part about this is that if you don't have a large family, you can just use leftovers from the whole pot roast dinner - veggies and all. Combine everything and bake it in a 9-inch square dish, using 1/2 the topping ingredients. When I made this last night, I used the roast to make both a square pan and a 9x13.
Tuesday, May 15, 2012
Chicken Meatballs with Penne
This recipe is what we had for dinner last night. We loved it! It was somehow different enough from regular spaghetti that it didn't feel like the same meal, even though it contains the same basic ingredients. It's also a departure from my usual method, in that it contains a specific type of canned tomatoes. I try to avoid ingredients like that because they can be hard to find. If you had to, I suppose you could use plain tomatoes in this, but I have really enjoyed the flavor addition of the red peppers. The fresh herbs are also a really necessary ingredient. If you grow your own, this is a pretty cheap meal! (In fact, the ground chicken I used I bought on sale for only $1.49!)
Chicken Meatballs with Penne
1 box penne pasta
1 pound ground chicken
1 tablespoon chopped parsley
1 tablespoon chopped oregano
1/2 cup soft bread crumbs
1/4 cup Parmesan cheese
1/4 tsp salt
1/8 tsp pepper
1/4 cup chopped onion
2 garlic cloves, chopped
2 tablespoons olive oil
1/4 cup assorted herbs (parsley, basil, rosemary, oregano - any combination of at least 2)
2 cans spicy red pepper diced tomatoes (Hunt's brand)
In a large bowl, combine the chicken, parsley, oregano, bread crumbs, Parmesan, salt and pepper. Form into bite-size meatballs. In a large skillet, brown meatballs in olive oil; add in onion and garlic. (You may need to add another tablespoon of olive oil.) Cook for 2-3 minutes. Combine the tomatoes and the remaining herbs in a blender and blend to desired consistency. Add to meatballs. Simmer, stirring occasionally, while you prepare the pasta according to package directions. When the pasta is done, drain it and serve with the meatballs and sauce.
Monday, May 14, 2012
Mediterranean Salmon Salad
This dish combines many of my favorite flavors. It was inspired by a friend who had eaten a Turkish dish with salmon and couscous. I'm not sure what else her meal involved, and I didn't have any couscous, so I experimented using what I had on-hand. I love that it's such a filling lunch - I didn't even crave an afternoon snack that day! I served mine warm, but I imagine this would be good as a cold salad, too, using leftover salmon.
Mediterranean Salmon Salad
1/2 cup quinoa
1 cup chicken broth
1 teaspoon olive oil
6 ounce salmon fillet
1 teaspoon lemon juice
1/2 teaspoon Greek seasoning
2 cups chopped spinach
1 tablespoon each chopped fresh parsley and oregano
3 tablespoons crumbled feta cheese
1/8 teaspoon coarse-ground black pepper
1 tablespoon olive oil
1 tablespoon lemon juice
Place the salmon fillet skin-side down on a foil-lined baking sheet. Sprinkle with lemon juice and Greek seasoning; bake at 375° for 15-18 minutes, or until the fish flakes easily with a fork.
Meanwhile, in a medium saucepan combine the quinoa, broth and olive oil. Bring to a boil and cook for 10-12 minutes, until the quinoa is tender and the grain is beginning to separate. Remove from heat.
Using a fork, break off chunks of salmon and add them to the cooked quinoa. Stir in the spinach, parsley, oregano, feta and pepper. Toss with the olive oil and lemon juice. Serve warm or cold.
Saturday, May 12, 2012
Multigrain Bread
When I was growing up, I used to love it when my mom made bread from scratch. The house smelled SO good and I can remember biting into that first warm butter-slathered slice. A while back, I found the recipe for Multigrain Bread and I thought it sounded so hearty and delicious that I had to try it! Let me tell you, I was not disappointed! This bread is soft and flavorful with just the right amount of chewiness. I love for my bread to have texture! I've made the recipe several times as written, but when I made it yesterday, I added a twist. After forming the dough into a rectangle, I spread it with a bit of butter and sprinkled on a mixture of cinnamon and white and brown sugars. (Raisins would be great, too, if you're into that sort of thing!) Then I rolled it up and baked it as directed.
Friends ... if I had not already secured Handsome's everlasting devotion, this cinnamon-swirled bread would have sealed the deal.
It took our family approximately 12 hours to consume the entire loaf.
If you'll excuse me, I'm now headed off to the gym.
Friends ... if I had not already secured Handsome's everlasting devotion, this cinnamon-swirled bread would have sealed the deal.
It took our family approximately 12 hours to consume the entire loaf.
If you'll excuse me, I'm now headed off to the gym.
Friday, May 11, 2012
Piña Colada Shakes
My kiddos adore what I've always called shakes. A more popular term would be "smoothies", I suppose, but no matter what you call them my kids love 'em. They're very versatile - I usually just throw together whatever I have into the blender and they drink it right up. Even Little One comes running when she hears the blender going. I've posted about them before, and here's a different take on their favorite treat:

Piña Colada Shakes
2-6 ounce cups orange creme yogurt
1 banana
1 cup frozen pineapple chunks
1/2 teaspoon coconut extract
1 cup milk
Combine all the ingredients in a blender and process until smooth.

Piña Colada Shakes
2-6 ounce cups orange creme yogurt
1 banana
1 cup frozen pineapple chunks
1/2 teaspoon coconut extract
1 cup milk
Combine all the ingredients in a blender and process until smooth.
Thursday, May 10, 2012
PB&J Croissants
This is a recipe I've used for years, and one my kids absolutely LOVE. It's in my cookbook, but I haven't shared it on the blog before now. It's amusing to me that my kids will claim boredom with sandwiches and then devour these! They're so simple that our Oldest Girl has made them for herself and siblings for lunch.
PB&J Croissants
1 can crescent rolls
8 teaspoons peanut butter
8 teaspoons jelly
Powdered sugar
Separate dough into eight triangles. On each triangle, at the wide end, place a dollop of peanut butter and jelly. Roll up into crescents and place on a greased baking sheet. Bake at 375° for 8-10 minutes, until golden. Remove from oven, let cool slightly, and dust with powdered sugar. Serve warm.

Wednesday, May 9, 2012
Shepherd's Pie
The other day my friend Amber accompanied me to the grocery store, since I had to do my shopping in the evening. She was picking up a few things she needed, too, including the ingredients to make shepherd's pie. As soon as she said the words I knew I had to make it! I haven't in so long, and I'm really not sure why. Probably my Oldest Girl's aversion to potatoes.
Anyway, here's my take on the classic ...
Shepherd's Pie
Pastry for a single crust pie - I use Jeni's Perfect Pie Crust with some changes: cornmeal in place of the sugar, water instead of apple juice, and regular vinegar instead of apple cider vinegar.
3/4 pound lean ground beef
1/2 onion, diced
1 clove garlic, diced
1 cup finely diced carrots
1 cup green peas
2 tablespoons flour
1 tablespoon vegetable oil
2 cups beef broth
1 tablespoon chopped fresh oregano (1/2 teaspoon dried)
1 tablespoon fresh thyme leaves (1/2 teaspoon dried)
1/2 teaspoon paprika
1 tablespoon apple cider vinegar
salt and pepper
1/2 cup shredded cheddar cheese
3 potatoes, peeled and diced
1/4 cup milk
2 tablespoons butter
1/4 cup sour cream
1 egg
In a large skillet, saute the garlic, onion, and carrots in the oil until they begin to soften. Add the ground beef and cook until the veggies are tender and beef is thoroughly browned. Sprinkle with flour, salt and pepper, and paprika. Cook for 2-3 minutes, then pour in the broth and vinegar, stirring constantly. Add in the peas and herbs. Adjust the seasonings if needed and remove from heat.
Meanwhile, cook the potatoes until tender; drain. Mash them with the milk, butter and sour cream. Add salt and pepper to taste; stir in the egg.
Roll out the pastry and fit it into a greased 9-inch pie plate. Pour in the beef mixture and top with the shredded cheese, then the potatoes. Bake at 350° for 45 minutes.
Now obviously you could streamline this process with store-bought crust and even the mashed potatoes can be purchased. But as I mentioned a couple of weeks ago, you'll be so glad you put in the extra effort for this fantastic meal!
Sunday, April 29, 2012
Nacho Cupcakes
I made some fun Nacho Cupcakes for our college people this afternoon.

 They were really simple and fun! I baked chocolate cupcakes and frosted them with orange-tinted cream cheese frosting. The "nachos" are tortillas spread with butter, cinnamon and sugar, cut into triangles, then baked. After they cooled, I stuck 2 or 3 in each cupcake and drizzled them with more frosting. Some I left like that and some I topped with a squirt of strawberry jelly "salsa" and a "jalapeño" made from sour jelly Lifesavers. I made two jalapeños from each Lifesaver by cutting out the middle with an icing tip.
I found the idea on Pinterest, through this link.


I found the idea on Pinterest, through this link.
Tuesday, April 24, 2012
The Little Things ...
I have often expressed to Handsome that I don't understand why my cooking is special - "I just follow the recipe!" The response I get is, "When have you ever followed a recipe exactly?" And it's so true! I nearly always change some ingredient or method to make the recipe my own. Often, it's things that are easily overlooked or that people think don't matter or won't make a difference. In my experience, though, it really DOES matter! I always try to make every ingredient count. If it doesn't add flavor or nutrition or both - it doesn't make the cut! Sometimes I'll be out of a "special" ingredient so I leave it out or use a substitute - and invariably Handsome says it doesn't taste as good. A perfect example is the apple pie I made for him recently. I didn't have any apple juice, which I usually use in my crust, so I subbed in water. Though he didn't know I'd changed anything he remarked that it wasn't up to my usual standard. I was shocked (and a little pleased!) that he noticed.
All that to say ... The little things matter. We've all heard the somewhat trite expression that the most important ingredient is love, but it's actually true! When you love your family and friends enough to go that extra mile to make the food they eat special, it means a lot. Sure, it's easy (and sometimes necessary!) to open a box of Hamburger Helper or whatever, but when you make it from scratch with healthful ingredients, adapting it to suit their preferences, your love and care over them really shows.
All that to say ... The little things matter. We've all heard the somewhat trite expression that the most important ingredient is love, but it's actually true! When you love your family and friends enough to go that extra mile to make the food they eat special, it means a lot. Sure, it's easy (and sometimes necessary!) to open a box of Hamburger Helper or whatever, but when you make it from scratch with healthful ingredients, adapting it to suit their preferences, your love and care over them really shows.
Thursday, April 19, 2012
My Lunch
For lunch today, Little One and I shared Quinoa Cakes. They were fabulous as usual! I made the cakes with chopped broccoli and shredded carrots. I served hers plain, but I made a Greek dipping sauce for mine. I simply combined sour cream, a touch of mayo, salt, pepper, crumbled feta, lemon juice, chopped rosemary and chopped oregano in a small bowl.


 |
| Little One made short work of hers! |
Wednesday, April 18, 2012
Teddy Bear Picnic
The other night, my Oldest Girl helped make dinner from a menu she chose. The theme was teddy bears! The idea came from one of my Taste of Home cookbooks and was originally for a baby shower. We made our own pretzel rolls and arranged them in a teddy bear shape, then made teddy bear cookies from a simple sugar cookie recipe.
 |
| Our Pretzel Roll teddy. |
 |
| I ate the teddy's appendages with ham, provolone, romaine, mayonnaise and mustard. |
 |
| Our teddy bear cookies, before baking. We rolled the dough balls in cinnamon sugar before assembling. |
 |
| Mini M&Ms and Peanut M&Ms formed their features. |
 |
| Yep, they're delicious! |
Tuesday, April 17, 2012
Stuff I've Made Lately
I go through different stages in my cooking where I either make all new things or get in a rut with old standbys. Mostly I try to do a mix of the two, but sometimes it just works out the other way. A few new recipes I've tried lately are going to be new favorites, I know!
Number one on that list is Homemade Cereal Bar Cookies! The lady who posted these originally bakes them in muffin cups, but I use a metal 9 x 13 baking pan. I line the pan with aluminum foil and spray it with cooking spray. The bars are layered in, pressing down the bottom and top crusts. When they've baked for 30-35 minutes, I let them cool completely, then turn them out onto a cutting board and cut them into bars. The whole family (Except one - remember the kids' unacknowledged rule, "One Must Dissent".) loved them! They don't last long, but I don't mind because they're so good for them! I used homemade pear freezer jam in the first batch, along with flax seed and cinnamon in the crust. (Those two things are supposed to be good for people who are watching their cholesterol.)
Homemade Twix Bars were a big hit with the college people, and Handsome, too!
I know, it's too late now, but file away these Easter Story Cookies for next year! They were a great way to illustrate the death, burial and resurrection of Christ.
You can always trust the Pioneer Woman to knock it out of the park and her Oatmeal Whoopie Pies are no exception. I went with the second filling option, That's The Best Frosting I've Ever Had, and I must say ... that's the best frosting I've ever had!
I realize all those are recipes for sweets, and I promise we eat entrees, too! I just haven't tried any new ones lately that are post-worthy - other than the soup I posted a few days ago. I've been on a big salad kick for lunches, and I made my Spinach Feta Hummus this week, plus macaroni and cheese, spaghetti, fried chicken, bacon cheeseburgers, chicken casserole ... so nothing I haven't shared already. I do have a few recipe ideas up my sleeve for next week, and I'm excited to try them out! I'll be sure to share them if they turn out well.
I
Friday, April 13, 2012
Grocery Shopping
I love grocery shopping almost as much as I love cooking - and my love is not even dampened by the fact that I always take my three little loves along! My ideal experience hinges on a few things, not the least of which is making sure that Little One's naptime is not hindered by the trip. My preference is to start on Thursday with cleaning out old food from the fridge and assessing what staples we're running low on from the fridge and pantry. I keep a notepad on the fridge to jot down items throughout the week, too, so I double-check that. If it's a staple I don't use often or definitely won't use in the upcoming week I consider it a "maybe" until I hear from Handsome what my budget is. I also spend time on Thursday going through my coupons and recipe and making my list. Also, I've posted before about what my fridge looks like by a typical Thursday, so I don't usually have much to work with. Once Friday comes and the shopping is done, the little people bring in the groceries while I put them all away.
 When time permits (we're talking ideal here, remember?) I like to go ahead and put everything away, including pouring flour, sugar, etc. into their bulk containers. If I'm home early enough and my schedule is clear, I'll even get chicken started in the slow cooker and prepare items like grapes and celery sticks for easy snacking.

Thursday, April 12, 2012
Creamy Tortellini Soup
Man, this soup was good! I was taking a chance since I knew Handsome isn't crazy about spinach or alfredo type sauces, but it paid off in this case. The flavors blended incredibly well and I found myself craving more even after I was full. Despite the chopping prep that's needed, the soup came together really easily and quickly. I keep diced ham in the freezer, and I added it straight from the bag, still frozen. This could also be easily adapted to a meatless meal by omitting the ham, using veggie broth, and maybe adding a can of navy or cannellini (white kidney) beans.
Creamy Tortellini Soup
2 tablespoons olive oil
1 tablespoon butter
1/2 shallot, chopped
1 garlic clove, chopped
1 cup diced ham
1 teaspoon each chopped fresh thyme and rosemary
1 tablespoon chopped parsley
1/8 teaspoon pepper
3 tablespoon flour
4 cups chicken broth
1 - 9 ounce package fresh cheese tortellini
3 cups fresh spinach, chopped
1/4 cup heavy cream
Parmesan cheese, shredded
In a large saucepan, saute the shallot, garlic and ham in the olive oil and butter until the ham begins to crisp and the shallots are translucent. Stir in the herbs and pepper; cook for one minute. Whisk in the flour; cook and continue whisking for 3-4 minutes. Gradually add in the chicken broth, stirring constantly. Bring to a boil and add the tortellini. Cook for 5 minutes, then stir in the spinach and cream. Heat through and serve with Parmesan cheese.
Wednesday, April 11, 2012
Easter Eggs
Just for fun this year, I decided to use natural elements to dye our Easter eggs. I read about it last year and filed the idea away in my brain for later recovery. Thankfully, I remembered! A quick internet search was all it took to get lots of ideas on what to do. Basically, you take the ingredient you want to use and combine it with eggs, water and a bit of vinegar and bring it to a boil. Boil it for 10-15 minutes, remove from the heat and then let the eggs soak in the solution. Some things required longer soaking than others, and it depends on how deep you want the color, too. I was surprised by some of the colors and others did just what I expected. I used coffee, sweet onion/shallot skins, spinach, mixed berries, red cabbage, red cabbage with baking soda, carrots, and turmeric.

I was very hopeful that the egg I dyed with cabbage and baking soda would take on the color of the dye, but it didn't. From a deep purple with just the cabbage, it transformed into a brilliant teal with the addition of baking soda. I was shocked at how rich the color was on the onion skin eggs, though! And disappointed the spinach and carrot eggs didn't take on much color at all, even after an overnight soak.
At any rate it was fun experimenting!

 |
| Here they are labeled with their dye ingredients. |
At any rate it was fun experimenting!
Subscribe to:
Posts (Atom)