Showing posts with label freezer. Show all posts

Tuesday, September 13, 2016

Green Smoothies

Green smoothies are all the rage right now, and it's easy to see why! They're packed with nutrition, taste fantastic, and are ridiculously easy to make. I have one for breakfast nearly every day. My morning routine is pretty consistent: wake up, drink a glass of water while standing at the sink, followed by coffee (with half and half and maybe 1/4 teaspoon brown sugar). Then in the mid-morning, around 9, I have a green smoothie. There are lots of different combinations of fruits and veggies you can use in them, and I'll share my favorites here. It's really more about a method than a recipe, per se.

Using plastic wrap, I bundle up the fruit I want to use into little packets. Several of those fit in a quart freezer bag. I like to make a few different combinations and keep them in separate, labeled bags. If you make all the same kind it's easier to put them all in a gallon-size freezer bag. When you want to make a smoothie, you have a couple of options. 1) Place the packet in the microwave for 15 seconds at half power or 2) Let it sit out on the counter for 5-10 minutes. This softens the fruit just enough to make it easier to pack into the blender cup. I place the fruit/veggies in a blender cup and add just enough orange juice or almond milk to come up halfway. Blend until smooth; drink up! The amount of liquid will vary a little depending on the fruit you used and how frozen solid it is.

(Generally, I freeze only fruit in the little bundles. I keep a bag of frozen kale and a bag of fresh spinach on-hand to add into the smoothies. To freeze kale, wash and dry it well, then place in a freezer bag. Remove every ounce of air and seal. Toss in the freezer. I have been told you can freeze spinach like this, too, but I haven't done it.)

Kitchen Sink smoothie, before adding OJ and blending.
Green Sunshine
pineapple
banana
mango
spinach
kale
OJ

Berry Blend
assorted berries: strawberry, blueberry, raspberry, blackberry
banana
spinach
kale
almond milk or OJ

Simple Green
banana
mango
strawberries
spinach
kale
OJ

Kitchen Sink
banana
pineapple
blueberries
strawberries
mango
spinach
kale
almond milk or OJ

Thursday, August 2, 2012

Breakfast Burritos

I love breakfast food! I like it best brought to me on a tray while I sip coffee in bed, but since that's never happened ... I'll take what I can get. These breakfast burritos are really wonderful. You can eat them right away, or freeze them for future use. They can be microwaved straight from the freezer! One minute and your breakfast is served. This recipe is more on the lines of assembly instructions, since you can use whatever your family likes to stuff them.

Breakfast Burritos

First, scramble some eggs! I use this basic recipe, but you make them how you like 'em:

I use about 1 egg per burrito. Five in this case. A dollop of sour cream, a splash of milk, salt and pepper.

Whisk it together really well! Then cook 'em.
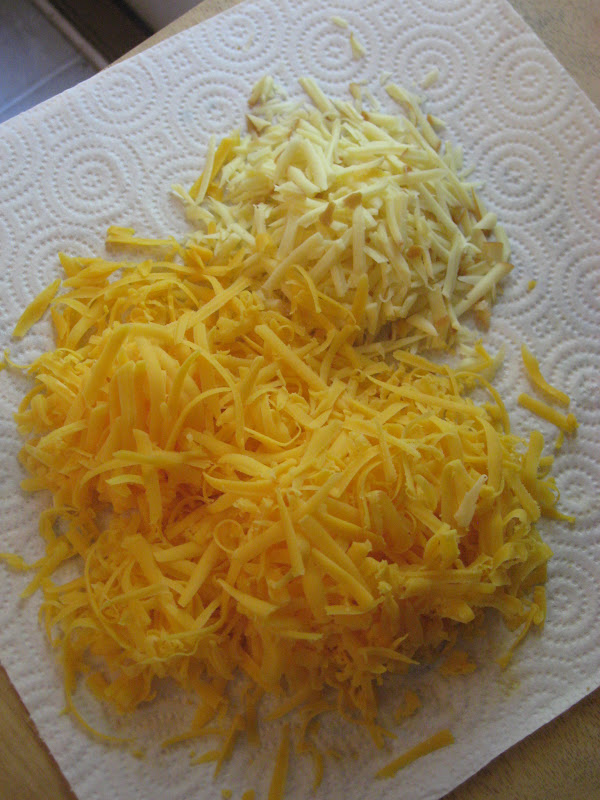
You'll need cheese, of course!

This is a mixture of gouda and sharp cheddar. I didn't use all of this - I was shredding for our dinner, too.
From this point, you can use sauteed peppers or onions; cooked bacon, sausage or ham; diced green onions; fresh herbs; anything you like in a burrito!

I used some sausage I got from my granny - It's SO good! I didn't have very much left, sadly, so I limited myself to 3 pieces per burrito.


Starting with the cheese, then eggs, layer your ingredients in the middle of the tortilla (I cup it in my hand to keep them contained), then fold them up!


Now they're ready to eat! Or, to prepare them for the freezer, wrap them in wax paper, then in aluminum foil.


If you feel sure your family will eat them fairly quickly (within a month), skip the aluminum foil and put them in freezer bags. 

To heat them, remove the foil but leave on the wax paper. Place on a plate in the microwave, and heat for 30 seconds. Flip it over, and heat for 30 more seconds. Depending on your appliance, it will probably be done at this point. If the wattage is lower (850 or less) it will need another 30-60 seconds.

Tuesday, July 31, 2012

Parmesan Chicken

Sometimes my recipes come from being creative with the limited food in my fridge and pantry. Sometimes I see a recipe and think, "I can do better than that!". Sometimes I take a good recipe and challenge myself to make it better. This chicken recipe is in that third category! The original looked really good, and I intended to make it as-is, but naturally, I put my own twist on it.

I bought boneless skinless chicken breasts on sale for $1.77 per pound at Kroger on Friday. Since they were pretty big, I decided to cut them in half, making two cutlets out of each breast. I placed 4 cutlets in each quart-sized freezer bag, then poured the marinade over them. One bag went in the fridge for dinner and one bag went into the freezer for another night. When I mixed the bread crumbs and Parmesan, I used half for dinner and put the other half in a freezer bag, in the freezer to use with the other chicken. Two meals, one prep time! This recipe is for the full amount of chicken, and you can divide it like I did if you don't need 8 pieces of chicken.

Parmesan Chicken

4 large chicken breasts
2 tablespoons chopped fresh herbs, or 2 teaspoons dried herbs (I used parsley, oregano and rosemary)
2 garlic cloves, chopped
1/4 teaspoon salt
1/4 teaspoon pepper
2/3 cup olive oil

2/3 cup fresh bread crumbs (I used whole wheat bread in the food processor)
2/3 cup grated Parmesan

In a small sauce pan, combine the herbs, garlic, olive oil, salt and pepper. Heat gently on low for 3-4 minutes. You just want to get the flavors infused into the oil, you're not cooking it really. Remove from heat. Using a sharp knife, cut the chicken breasts cross-wise into cutlets. (This works best if the chicken is partially frozen.) Place the chicken in a resealable bag and pour the marinade over it. Allow the chicken to marinate in the fridge for 6-8 hours, or overnight.

Remove the chicken from the fridge, and preheat the oven to 375°. In a shallow dish, combine the bread crumbs and Parmesan. Press both sides of each cutlet into the crumb mixture and place in a baking dish. Bake for 15 minutes, flip them over, and bake for 10 more minutes until the juices run clear. Don't overbake it!

Tuesday, July 17, 2012

Chicken Cordon Bleu Casserole

My favorite main dish of all time would have to be Chicken Cordon Bleu. I just love the combination of flavors! Sadly, no one else in my family actually likes ham, so I don't get to have it very often. I came up with this recipe recently, though, when I needed a meal to take to a friend who was having surgery. One of these days I'll make it for my family and hope for the best!

Chicken Cordon Bleu Casserole

2 cups shredded/cubed cooked chicken
8 ounces uncooked pasta (rotini, shells, penne)
1 (10-3/4 oz) can cream of chicken soup
8 ounces sour cream
1 cup cubed ham
2 cups shredded Swiss cheese
salt and pepper
1 tablespoon fresh thyme


1/2 cup Italian bread crumbs
2 tablespoons Parmesan cheese
2 tablespoons butter, melted

Cook pasta according to package directions; drain and place in large bowl. Mix in chicken, soup, sour cream, ham, thyme and cheese. Salt and pepper as you like. Pour into a greased 9-inch square baking dish. In a small bowl, mix together the bread crumbs, Parmesan, and butter. Sprinkle over the casserole. Bake at 350 for 25-30 minutes, until bubbly and topping is lightly browned.

 This recipe is a variation of my Chicken Ranch Casserole, which is one of my most often requested recipes.

Monday, December 19, 2011

Slow Cooked Chicken

I don't love housework, but I do love all the "mod cons" - as our friends across the pond call modern conveniences. There's something supremely satisfying about knowing the dishwasher, washing machine and dryer are all working away in the background while I'm busy with other things. I feel the same way about my slow cooker. Knowing that dinner is ready to go with little to no further effort on my part is comforting in a way. It's one less thing to concern myself with as we finish up other chores and work on school for the day. Other than for a meal, I also like to use my slow cooker for large batches of chicken. I buy it as it's on sale, then when I get a few packages I pull them out of the freezer and cook them all at one time. I wrote about that process in this post. I'll be doing that today! I'm cooking down about $5.00 worth of chicken which will translate to about 4 meals for our family. When I have it all packaged up, the shredded chicken will go in the freezer to await its fate in one of these recipes:

Chicken Parmesan Casserole

Thai Chicken Pasta

Chicken Ranch Casserole

Chicken Parmesan Calzones

Chicken Salad

Chicken Pot Pie

... Or any number of other fabulous options!

A special thanks goes out to our "college people", who blessed me with a new slow cooker last night! It's non-stick and stainless steel and programmable ... and I'm so excited! Thank you so much! We love y'all.

Tuesday, November 8, 2011

Pumpkin!

I am all about saving some money! On Halloween, a friend posted that he had just carved a pumpkin. Immediately my spidey-senses were tingling! He was planning to come for dinner the next day, so I asked him if I could have his leftover jack o' lantern. He readily agreed, and I was very excited about the prospect of fresh pumpkin! To prepare it, since I use it mainly for baked goods, I carved Jack up into smaller pieces and laid them skin side down onto two baking sheets. Then, I added some water to the pans - just enough to barely cover the bottom. I baked them at 400° until the house smelled really good and the pumpkin was tender. After cooling them for a bit, I used a spoon to scrape the meat out into my food processor. When I needed a touch of water to loosen up the mixture, I used what was left in the baking sheets. To freeze it, I divided the pumpkin into 1/2 cup containers since my favorite recipes call for 1/2 cup or whole cup amounts. All in all, I ended up with over 8 cups of pumpkin! After pricing canned pumpkin at the store, I saved about $12, depending on the brand/sales. My first project was to make a double batch of Jeni's Pumpkin Bread, which I baked into muffins plus one loaf.

It just goes to show that with a little ingenuity and a bit of hard work, you can save a lot of money!

Friday, September 23, 2011

Ginger-Lemon Pear Freezer Jam

A couple of weeks ago, we went to dinner at the home of some delightful friends. The lady of the house had spent the best part of the day canning pears and she served some of the fruits of her labor with us at the table. One special touch she'd added to her canning recipe was to use ginger and lemon, and the pears were lovely! She send me home with a large bag of pears so I could make some freezer jam. Already, I was feeling inspired to try out the combination of ginger and lemon!


Ginger-Lemon Pear Freezer Jam

6 cups crushed pears (peel, core, and pulse in food processor - do not pureé)
4 cups sugar
Juice and peel from one lemon
1-inch piece of ginger, peeled and grated (use a microplane, or chop finely)
1.75 ounce packet low-sugar pectin
1 teaspoon vanilla extract

Place pear, lemon juice and peel, vanilla and ginger in a stock pot. Stir in pectin. Place pan over high heat; bring to a boil. Stir in sugar; cook 5 minutes or until sugar dissolves. Bring to a boil; cook for 1 minute, stirring constantly. Remove from heat. Skim foam from surface; discard. Stir 5 minutes to ensure fruit is suspended in jam. Divide jam into jars, seal, and allow to come to room temperature. (Not more than 24 hours.) Store in refrigerator for 3 weeks or in the freezer for 12 - 18 months.


Thursday, August 18, 2011

Delicious Lunch - Tomato Soup

I had a very tasty, surprisingly filling lunch yesterday! I had taken a chance at Kroger the other day and bought a carton of tomato soup from the organic section, and it seriously paid off. I spent about $3 on the carton of Imagine Garden Tomato Soup, compared to about $1 on the standard Campbell's Condensed Tomato Soup. Keep in mind, though, that I'll get 3-4 servings from the carton, and the can would only be 1 serving. Continuing the comparison:

Imagine
80 calories
300mg sodium
16g carbs
2g sugar
2g fiber
2g protein
15% vitamin A
30% vitamin C
2% calcium
4% iron

Campbell's
90 calories
480g sodium
20g carbs
12g sugar
1g fiber
2g protein
8% vitamin A
10% vitamin C
0% calcium
4% iron

To boost the flavor and  nutrition, I added 1/2 cup roasted red pepper puree, fresh-ground black pepper and a sprinkling of feta cheese. For the puree, I roasted two peppers in my oven until they were blackened. Immediately after removing from the oven, I covered them tightly with foil and let them steam. Then I removed the skin (it slips off pretty easily!), seeds and stems. The meat of the pepper went straight into the blender along with the juice from the steaming packet and a couple of tablespoons of water. I pureed it, pouring some into the pot with my tomato soup, some into the carton with the rest of the soup, and the remainder went into freezer containers for another time!

Thursday, August 4, 2011

Baked Chicken

Yesterday, I baked a chicken for dinner using a cool baking contraption my mom bought for me.

It works just like the "Soda Can Chicken" concept, only you can use whatever liquid you like in the middle. My favorite thing is fruit juice - orange or apple, or a blend of different citrus juices.

The chicken sits in it, like a special little chair.
I marinated the chicken this time (I don't always), in a blend of onion, garlic, rosemary, thyme, sage, salt, pepper, and apple juice. Then you just bake the little guy (gal) for about an hour at 375°, testing with a meat thermometer to make sure it's done.

The lovely part about this is that you can use the meat for your meal, then make broth with the bones! I have a pot working right now (it smells SO good!) full of my chicken bones, carrots, onion, and S&P. After simmering it for a couple of hours, I'll strain everything out, then let the broth sit in the fridge overnight. In the morning I'll skim off the fat and store the broth in the freezer.

Bonus: I only paid about $3.50 for this chicken and it will provide two meals, plus the broth for another one or two meals.

Wednesday, July 6, 2011

Frozen Hawaiian Pie

I was a picky child. Bless my Mama's heart, I was a very picky child. Though I don't have it now, I did have a sweet tooth then. I loved most any dessert Mom made, including this pie. I would have sworn I hated pineapple since I had no idea it was a major ingredient in this yummy concoction! By the time I found out I liked it too much to give it up on principle. It was a sad day in our home when, while grocery shopping, my mom left her recipe book in the cart - never to be seen again. Years later, I found a similar recipe and tweaked it to match Mom's and life was good once more. Here it is!

Frozen Hawaiian Pie

14 ounce can sweetened condensed milk
16 ounce container frozen whipped topping, thawed
20 ounce can crushed pineapple
1 cup chopped walnuts or pecans
2 tablespoons lemon juice
2 cups shredded coconut
2 9-inch graham cracker pie crusts

In a bowl, combine milk and whipped topping. Gently fold in pineapple, nuts, lemon juice and coconut. Pour into crusts. Freeze until firm (at least 4 hours). Remove from freezer 20 minutes before serving.

Wednesday, June 29, 2011

Summer's Bounty

Ah, summer ... the time of year when all manner of veggies and fruits are in season! Of course, in today's world our diet can be more varied than ever before, with nearly every type of produce imaginable being available year-round. But, there's nothing like being able to get fresh, local fruits and vegetables in the summer.  The problem I find is that we can't eat it all fast enough! Often I find myself scrambling to use up that lone zucchini or the handful of grapes or the solitary kiwi before it's too late. There are lots of ways to make your produce last, though, so be proactive and plan ahead not only what recipes you'll use the produce in, but what you'll do with the leftovers.

Canning - I'm not a "canner" myself (too lazy!), but I know lots of people who are, and it's a great way to preserve summer's bounty.

Freezer Jam - A delicious, simple way to use berries and other fruits. My favorite is Strawberry Freezer Jam.

Creative Salads - "Lettuce, tomato, cucumbers and Ranch" doesn't have to be where your salad ideas end! Think outside the box with different combinations of veggies, fruits and dressings.

Smoothies - A great way to use up not only fruits, but vegetables, too!

Freezing -  The link I've provided leads to a really comprehensive site on freezing all kinds of produce! It's a good site, overall, too, and is the same one I recommended for canning.

I hope these suggestions help you make the most of the beautiful, delicious abundance of summer!

Thursday, June 16, 2011

Coming Soon ...

This morning I thought I'd share with y'all some recipes I have bookmarked for future use. Often while browsing the internet I find a recipe that sounds really good, so I'll save the link for later. Some work out, some don't, but here are a few that I haven't tried yet:

Nutella Banana Ice Cream - I've heard of making banana ice cream before, and I love the addition of Nutella! Can't wait to try this simple, no-ice-cream-maker-required treat!

Pretzel Rolls - I'm not a fan of pretzels, but these rolls sound really tasty, like soft pretzels: soft and chewy. This recipe is also on a fantastic website, Tasty Kitchen. I'm planning on making my Pretzel-Crusted Chicken soon, and these would be great on the side!

Fresh Gnocchi - I love gnocchi and it's one of the two ways my Oldest Girl will eat potato. (The other way being potato candy!) I have made ricotta based gnocchi before, and I'm eager to try out the potato version.

Aloha Cake - Since I'm trying to incorporate more fruit into my diet, I thought I'd try out this cake! It totally counts, right?

Tuesday, May 17, 2011

Strawberry Freezer Jam

Me. Our Oldest Girl took this picture.

Our family went to a strawberry field recently to pick our own berries. The last time we did that was three years ago, but we've wanted to go back ever since. I made strawberry freezer jam then, and I really wanted to try my hand at it again. I tweaked a recipe I found, reducing the sugar and adding a bit more flavor. I like my strawberries finely mashed, but if you like yours to be chunkier, go for it! Just add about a 1/2 cup of water to the strawberry mixture before you add the pectin. (If your berries are finely mashed the jam will be thinner than the traditional texture you're used to.)

Strawberry Freezer Jam


2 quarts fresh strawberries
4 cups sugar
3/4 cup light corn syrup
2 tablespoons lemon juice
2 tablespoons lime juice
1 package (1-3/4 ounces) powdered fruit pectin for low-sugar recipes

Wash, stem and mash the berries, measuring out enough mashed berries to make 4 cups; place in a large stewpot. Stir in the sugar, corn syrup, lime juice and lemon juice. Let stand for 10 minutes. Stir in pectin. Bring to a full rolling boil over high heat, stirring constantly. Boil for 1 minute, stirring constantly. Remove from the heat; skim off foam. Pour into jars or freezer containers, leaving 1/2-in. headspace. Cover and let stand overnight or until set, but not longer than 24 hours. Refrigerate for up to 3 weeks or freeze for up to 1 year. Yield: 4-1/2 pints.

Our Little One

Monday, May 16, 2011

Chicken Ranch Casserole

This casserole is simple to throw together, particularly if you keep cooked chicken in your freezer like I do.  I use my White Sauce recipe (in a 2-2-2 ratio) in place of the cream soup sometimes, and if the mixture doesn't seem moist enough you can stir in a 1/2 cup of chicken broth or milk to help with that. This is truly one of those recipes that pretty much everyone loves and it's so easy!

Chicken Ranch Casserole
2 cups shredded/cubed cooked chicken
8 ounces uncooked pasta (rotini, shells, penne)
1 (10-3/4 oz) can cream of chicken soup
8 ounces sour cream
1 envelope dry Ranch dressing mix
2 cups shredded cheddar cheese

Cook pasta according to package directions, drain and place in large bowl. Mix in chicken, soup, sour cream, dressing mix, and 1 cup cheese. Pour into a greased 9-inch square baking dish. Top with remaining cheese. Bake at 350 for 25-30 minutes, until bubbly and cheese is melted.

This recipe is easy to double so you can feed more people, or to have an extra casserole in the freezer for another time. If you seasoned your chicken when it was cooked and salted the water for your pasta, you probably won't need to add anything else to this casserole. Otherwise, you might want to salt and pepper while mixing everything together.

Friday, April 8, 2011

Jeni's Perfect Pie Crust

After being an apple pie enthusiast for years, Handsome experienced the apple tart at Shields Tavern in Williamsburg, Virginia. After closing his eyes in rapture and being unable to speak for some time, he solemnly announced that the gauntlet had been thrown. THIS was the apple pie to beat.

I quickly started to work, trawling the vast ocean of the internet, looking for THE perfect pie crust. This was how I discovered The Pioneer Woman, as discussion board after comment section after blog kept resulting in:

"PW's is the best!"
"Here's a link to P-Dub's recipe!"
"The Pioneer Woman!"
And even the occasional, "Prairie Woman" reference. Anyway, I spent approximately the next 13 years reading about Marlboro Man and homeschooling and cowboy food on her website and then I got back to my search for pie crust.

Alton Brown figured in at one point. Taste of Home made its obligatory appearance. And I finally developed my own recipe. It's a beautiful thing and I've decided to share it with you. (Please start by purchasing a food processor or you will spend approximately the next 13 years cutting butter and shortening into flour. And nobody wants that for you.) Remember, with pie crust technique is just as important as ingredients.


Jeni's Perfect Pie Crust

2 1/2 cups all-purpose flour
1 teaspoon salt
1 tablespoon sugar
1 stick butter
1/2 cup shortening
1/4 cup apple juice
1 tablespoon apple cider vinegar

Place the dry ingredients in a food processor bowl that has been fitted with the regular blade. Put the bowl in the refrigerator. Cut the butter and shortening into tablespoon-sized pieces and place them on a small plate in a random-ish pattern. Measure out the apple juice and pour in the vinegar. Place the juice mixture and the plate of butter/shortening in the freezer for 10 minutes.

When the time's up, put the food processor bowl on the base and pulse a few times to combine the ingredients. Add in the butter/shortening, half at a time, pulsing until the ingredients begin to come together. Then turn the processor on, and drizzle in the juice. It should only take about thirty seconds. The dough is ready at this point to be divided in half and placed on large squares of plastic wrap. It will be crumbly, but just draw the edges of the wrap over each portion of the dough, pressing it to make a disk. After this point, you have a few options:

To use right away, place the disks in the freezer for 20 minutes, then use them for your pie.

To use in the next day or two, place the disks in the refrigerator.

To use another time, place the disks, still in their plastic, into labeled zip-top bags and store in the freezer for up to three months. Thaw in the refrigerator before using.

Thursday, March 24, 2011

Fruit Smoothies

One treat my kids always look forward to is fruit smoothies. The variations are endless, and it's pure nutrition they're getting! I usually make a batch in my blender, serve them their drinks, and use the rest to fill up popsicle molds. Later, they have delicious frozen treats with very few empty calories. Here's a basic recipe:

1 banana
½ cup frozen berries
1 cup (8 ounces) yogurt, your favorite flavor
¼ - ½ cup milk
View full recipePlace all ingredients in blender; process until smooth!

Variations:
* Use strawberries and banana, adding a spoonful of chocolate drink mix/syrup
* Use peaches in place of the berries, with peach yogurt
* Use orange juice instead of milk

Basically, you can combine any of your favorite fruits to make these. My kids' favorites are Banana-Berry and Orange-Peach. Even The Boy, who will pretty much eat only apples, bananas and pineapples is very adventurous in the smoothie department. Just the other day he begged me to buy the special ingredient we needed to make Mold Shakes.

Saturday, March 19, 2011

Joe's Sloppy Joes

Whenever I ask The Boy if he has any requests for dinner over the following week, he invariably replies with "Sloppy joes."  This recipe is just for him.

Joe's Sloppy Joes

1 pound lean ground beef (or turkey or venison)
1/2 sweet onion, chopped
2 cloves garlic, chopped
2 tablespoons brown sugar
1 teaspoon chili powder
dash of nutmeg
salt and pepper to your taste (you may not have to add any)
1 bottle chili sauce
1/2 cup ketchup
1/2 cup salsa
1/2 cup beef broth (optional)

In a large skillet, saute meat, onion and garlic over medium heat until the meat is browned. If you use very lean turkey or venison, you may need to add in a tablespoon or so of oil. Stir in seasonings and saute for a couple more minutes; then add in chili sauce, ketchup and salsa. At this point you really just have to heat the mixture through for 5-10 minutes and it's ready to eat. I prefer to add in some beef broth in order for it to all simmer together a while longer. This makes enough for about 8-10 sandwiches.

*This freezes really well!
* An option we all like just as much is to use barbecue sauce in the place of the salsa. They still taste like sloppy joes, but with a smoky flavor.

Saturday, February 12, 2011

Apple-Walnut Pancakes

Instead of making breakfast and lunch today, I decided to make brunch around 11. That suited my family just fine since brunch rarely involves vegetables! I served scrambled eggs and Apple-Walnut Pancakes. The great thing about pancakes is that they usually make a big batch and I can freeze half of them. Here's how I prepare them for the freezer:

As I cook them, I lay them out in a single layer on a wire rack to cool.

Then I tear off strips of wax paper to place between each pancake. Each strip will cover two pancakes.

Then I slide the wrapped pancakes into a labeled freezer bag.

All done! Now I can thaw all of them for a family dinner, or I can take out one or two at a time. My favorite way to reheat them is to place them straight from the freezer on a cookie sheet in a 350 degree oven for 7-10 minutes. I flip them halfway through.

Monday, January 24, 2011

Leftovers

One Sunday night after church, a few friends asked if they could come over to hang out. I was planning to make calzones for the family, so I told them that rather than stop for fast food, if they wanted to stop by the store to pick up their favorite fillings I would make calzones for them, too. They readily agreed and showed up with Italian sausage, pepperoni, mozzarella and mushrooms.

Later in the week I knew I had to do something with the leftover pizza ingredients in the fridge! I boiled up a big pot of penne and rotini pasta, defrosted a bag of spaghetti sauce, diced the pepperoni, and cooked up the Italian sausage. I also defrosted a lone leftover (raw) chicken breast, which I diced and sauteed in the same pan I'd used for the sausage. In a large bowl, I stirred together about half of the pasta, the pepperoni and sausage, a couple of cups of sauce, and a cup or so of mozzarella. I poured that into a foil-lined baking dish, topped it with more cheese and popped it in the freezer. Once frozen, I wrapped it in another layer of foil and labeled it, placing it back in the fridge.

In the same bowl, I stirred together the rest of the pasta, the cooked chicken, a couple of cups of sauce, and more mozzarella, topping it with cheese. I froze it the same way I did the other casserole.

The mushrooms were cleaned, sliced and sauteed in a bit of olive oil. Then I placed them in a freezer container and froze them, too, for another day.

It's always a good idea to cook or freeze your leftovers like that so that they don't go to waste, languishing in the fridge. I've learned, after throwing away lots of good intentions, that the freezer is my friend! If you're not sure what freezes well, a few quick keystrokes in an internet search engine will tell you.

I'm planning a post soon on freezer tips so let me know if you have any suggestions. 

Saturday, January 22, 2011

Burrito Casserole

Burrito Casserole

1/2 pound ground beef (I use 93% lean)

Taco seasoning (1 envelope, or use your favorite blend of spices)
1 clove garlic
1/2 onion, chopped 
1 can refried beans (I use fat-free or vegetarian)

1 can enchilada sauce
1 can cream of chicken soup

8 flour tortillas

2 cups shredded cheddar cheese
1/2 cup cilantro, chopped
2 green onions, sliced

1 cup dry rice, cooked according to package directions.

Brown the ground beef with the garlic and onion. When the beef is mostly browned, stir in the spices. After it's completely cooked, stir in the beans. Cook for 2 minutes longer and remove from heat. Stir in about a 1/4 cup of the enchilada sauce. In a small bowl, whisk together remaining sauce and cream of chicken soup.

Spread the prepared rice into a greased 9x13 pan. On each tortilla, place a couple of tablespoons of cheese, about 1/3 cup of the beef/bean mixture, and sprinkle with cilantro and green onions. Fold in the sides and roll up, burrito-style. Place in pan. Repeat with all 8 tortillas. (They'll be crowded in the pan.) Pour the sauce/soup mixture over the burritos and top with any remaining cheese, green onions and cilantro. Feel free to shred more cheese to go on top! I know I do. Bake at 375 for about 20 minutes, until cheese and sauce are bubbly.  Serve with additional green onion, cilantro, sour cream, olives, whatever you like!

***This makes a delicious, mildly spicy dish. You can certainly amp up the heat by using hot enchilada sauce in place of mild, more spice in the beef, and pepper jack cheese.

***This casserole freezes very well, too! You can also divide the recipe between two square pans, freezing one and baking one. I used to do that until the kids started eating an entire burrito each! And Handsome would have two, and pretty soon the pan's empty!

***I know this is getting long, but one more note: I go ahead and cook up a full pound of beef, since that's how it's usually packaged. Before I add the beans, I take out half the beef and package it for the freezer. Then I have a head start on another meal another day.