Showing posts with label saving money. Show all posts

Monday, September 12, 2016

Making Fresh Herbs Last

Once you bring home leafy green herbs, it's only a matter of time before they're a slimy, unusable mess. Unless, of course, you store them properly! For the long-term, you can always freeze or dry your herbs, but some recipes require fresh herbs. I've tried various methods of keeping them fresh over the years, and this is my favorite:


When your leafy herbs like cilantro (left) and Italian parsley (right) come home, you should process them right away. I rinse them well with water - cilantro especially can trap sand. Shake off the excess water and blot the leaves dry with a clean kitchen towel.

Check the herbs for yellowed or spoiled leaves. Check the stems for any trapped leaves. You want the stems to be as clean as possible. Fill a small mason jar halfway with water - but make sure none of the leaves will be underwater. Depending on how large your bunch of herbs is, you'll need a sandwich or a quart size plastic storage bag to cover them. Store in the fridge.

They'll stay fresh this way for a good 10 days. I've also used this method with small bunches of kale. The leaves stayed crisp far longer than I expected.

Wednesday, February 27, 2013

Loving Leftovers!

If you've been reading my posts for any length of time, you know I hate to waste any leftovers. The other night I made Crunchy Cheddar Chicken - and my family loved it! (As you also may know, when I say "my family" that means that one of them probably dissented. Our boy, in this case.) Anyway, we had just a little bit leftover, but it was so good I had to save it! I mean, it was like, half a cutlet. Today for lunch, though, I found a use for it!

After slicing it into four strips, I heated the chicken in the microwave. On two tortillas, I layered some shredded cheddar cheese, Romaine lettuce, and ranch dressing. I divided the chicken between the tortillas, rolled them up, sliced them in half and served them with baby carrots and more ranch to my big kids! Other than the ranch, everything was an unexpected leftover from a previous meal. I love getting "bonus meals" like that from my groceries! Another thing I loved was that our boy ate it up! He loved the roll-ups even though he had not enjoyed the chicken the first time around. His expression when I told him it was the leftover chicken was priceless!

Tuesday, September 4, 2012

Yogurt Parfaits

Sometimes, well, a lot of the times, the extra effort is definitely worth it.

(Rambling Side Note: It makes me giggle when someone misspells 'definitely' to look like 'defiantly'. I imagine they have really strong feelings about the subject and would fight you for it. "I defiantly think Star Trek is better than Star Wars." or "David Tennant is defiantly a better Doctor than Christopher Eccleston." Anyhoo ...)

When it comes to homemade, I've told you before how I feel. It's amazing how easy some things are to do, and how much cheaper they are to make from scratch.

Homemade yogurt is a good example. For the cost of a gallon of milk ($3 for me) and some cheesecloth, you can make it at home and know exactly what's in it! You can sweeten/flavor the whole batch when it's done, or do it by the serving. I like to keep it plain and flavor it by the serving so I can use the plain in place of sour cream or mayonnaise in recipes. Out of that gallon of milk, I got 3 pint jars of Greek yogurt, plus a bit more. I also got 2 quart jars (plus some) of whey. Whey is great to use in smoothies, and in place of liquid called for in yeast breads. You can also check this link for lots more uses. For the name brand of Greek yogurt (tastes better than store brand) it usually costs between $3 and $5, depending on sales and brand, for the 16 ounce container. Cheaper and better for you - I can get behind that!

This morning I made Honey-Vanilla Granola, from my friend Leah's recipe. It is so easy and delicious. It's a big batch, but it's pretty tasty so I'm not sure it's going to last long! Start to finish for me? 25 minutes. (15 of that, hands-off.)

I also threw together a strawberry sauce. I've been taking advantage of the strawberry sales this summer and buying them up. I wash, trim, and freeze them so I can use them throughout the year. The sauce was simply strawberries, a touch of sugar, and almond extract simmered together. I cooled the mixture and popped it in the blender to get it smooth.

Later, I'll layer the yogurt, granola and strawberry sauce to make parfaits for the kiddos. Purchased at the store, the parfaits are easily $1.50 apiece, and full of unpronounceable ingredients.


Thursday, August 2, 2012

Breakfast Burritos

I love breakfast food! I like it best brought to me on a tray while I sip coffee in bed, but since that's never happened ... I'll take what I can get. These breakfast burritos are really wonderful. You can eat them right away, or freeze them for future use. They can be microwaved straight from the freezer! One minute and your breakfast is served. This recipe is more on the lines of assembly instructions, since you can use whatever your family likes to stuff them.

Breakfast Burritos

First, scramble some eggs! I use this basic recipe, but you make them how you like 'em:

I use about 1 egg per burrito. Five in this case. A dollop of sour cream, a splash of milk, salt and pepper.

Whisk it together really well! Then cook 'em.
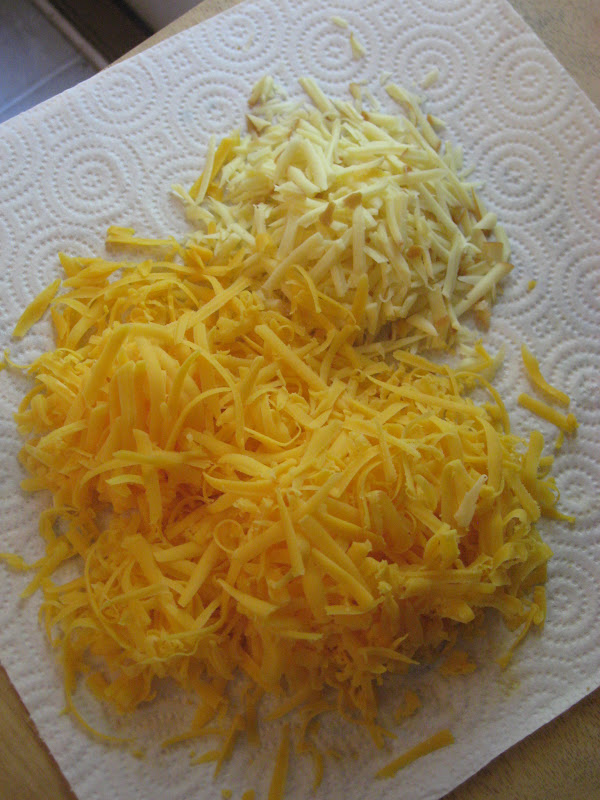
You'll need cheese, of course!

This is a mixture of gouda and sharp cheddar. I didn't use all of this - I was shredding for our dinner, too.
From this point, you can use sauteed peppers or onions; cooked bacon, sausage or ham; diced green onions; fresh herbs; anything you like in a burrito!

I used some sausage I got from my granny - It's SO good! I didn't have very much left, sadly, so I limited myself to 3 pieces per burrito.


Starting with the cheese, then eggs, layer your ingredients in the middle of the tortilla (I cup it in my hand to keep them contained), then fold them up!


Now they're ready to eat! Or, to prepare them for the freezer, wrap them in wax paper, then in aluminum foil.


If you feel sure your family will eat them fairly quickly (within a month), skip the aluminum foil and put them in freezer bags. 

To heat them, remove the foil but leave on the wax paper. Place on a plate in the microwave, and heat for 30 seconds. Flip it over, and heat for 30 more seconds. Depending on your appliance, it will probably be done at this point. If the wattage is lower (850 or less) it will need another 30-60 seconds.

Tuesday, July 31, 2012

Parmesan Chicken

Sometimes my recipes come from being creative with the limited food in my fridge and pantry. Sometimes I see a recipe and think, "I can do better than that!". Sometimes I take a good recipe and challenge myself to make it better. This chicken recipe is in that third category! The original looked really good, and I intended to make it as-is, but naturally, I put my own twist on it.

I bought boneless skinless chicken breasts on sale for $1.77 per pound at Kroger on Friday. Since they were pretty big, I decided to cut them in half, making two cutlets out of each breast. I placed 4 cutlets in each quart-sized freezer bag, then poured the marinade over them. One bag went in the fridge for dinner and one bag went into the freezer for another night. When I mixed the bread crumbs and Parmesan, I used half for dinner and put the other half in a freezer bag, in the freezer to use with the other chicken. Two meals, one prep time! This recipe is for the full amount of chicken, and you can divide it like I did if you don't need 8 pieces of chicken.

Parmesan Chicken

4 large chicken breasts
2 tablespoons chopped fresh herbs, or 2 teaspoons dried herbs (I used parsley, oregano and rosemary)
2 garlic cloves, chopped
1/4 teaspoon salt
1/4 teaspoon pepper
2/3 cup olive oil

2/3 cup fresh bread crumbs (I used whole wheat bread in the food processor)
2/3 cup grated Parmesan

In a small sauce pan, combine the herbs, garlic, olive oil, salt and pepper. Heat gently on low for 3-4 minutes. You just want to get the flavors infused into the oil, you're not cooking it really. Remove from heat. Using a sharp knife, cut the chicken breasts cross-wise into cutlets. (This works best if the chicken is partially frozen.) Place the chicken in a resealable bag and pour the marinade over it. Allow the chicken to marinate in the fridge for 6-8 hours, or overnight.

Remove the chicken from the fridge, and preheat the oven to 375°. In a shallow dish, combine the bread crumbs and Parmesan. Press both sides of each cutlet into the crumb mixture and place in a baking dish. Bake for 15 minutes, flip them over, and bake for 10 more minutes until the juices run clear. Don't overbake it!

Wednesday, March 7, 2012

Homemade Yogurt

My kids all love yogurt, but I limit the amount they eat simply because it gets expensive. Several weeks ago I found a blog post on how to make yogurt at home in the slow cooker and I have finally accomplished it! It turned out really well. Though it takes time to go through the process, it's not a lot of "hands-on" time and I found it to be pretty simple. I used a half-gallon of organic 1% milk this time, but since it turned out so well, I'll do a full gallon next time. The higher the fat content in your milk, the creamier your yogurt will be, but since I have a toddler with (genetically) high cholesterol we went with the lower fat and it worked just fine.


If you'd like to try it, too, just check out this link!

Monday, December 19, 2011

Slow Cooked Chicken

I don't love housework, but I do love all the "mod cons" - as our friends across the pond call modern conveniences. There's something supremely satisfying about knowing the dishwasher, washing machine and dryer are all working away in the background while I'm busy with other things. I feel the same way about my slow cooker. Knowing that dinner is ready to go with little to no further effort on my part is comforting in a way. It's one less thing to concern myself with as we finish up other chores and work on school for the day. Other than for a meal, I also like to use my slow cooker for large batches of chicken. I buy it as it's on sale, then when I get a few packages I pull them out of the freezer and cook them all at one time. I wrote about that process in this post. I'll be doing that today! I'm cooking down about $5.00 worth of chicken which will translate to about 4 meals for our family. When I have it all packaged up, the shredded chicken will go in the freezer to await its fate in one of these recipes:

Chicken Parmesan Casserole

Thai Chicken Pasta

Chicken Ranch Casserole

Chicken Parmesan Calzones

Chicken Salad

Chicken Pot Pie

... Or any number of other fabulous options!

A special thanks goes out to our "college people", who blessed me with a new slow cooker last night! It's non-stick and stainless steel and programmable ... and I'm so excited! Thank you so much! We love y'all.

Tuesday, November 8, 2011

Pumpkin!

I am all about saving some money! On Halloween, a friend posted that he had just carved a pumpkin. Immediately my spidey-senses were tingling! He was planning to come for dinner the next day, so I asked him if I could have his leftover jack o' lantern. He readily agreed, and I was very excited about the prospect of fresh pumpkin! To prepare it, since I use it mainly for baked goods, I carved Jack up into smaller pieces and laid them skin side down onto two baking sheets. Then, I added some water to the pans - just enough to barely cover the bottom. I baked them at 400° until the house smelled really good and the pumpkin was tender. After cooling them for a bit, I used a spoon to scrape the meat out into my food processor. When I needed a touch of water to loosen up the mixture, I used what was left in the baking sheets. To freeze it, I divided the pumpkin into 1/2 cup containers since my favorite recipes call for 1/2 cup or whole cup amounts. All in all, I ended up with over 8 cups of pumpkin! After pricing canned pumpkin at the store, I saved about $12, depending on the brand/sales. My first project was to make a double batch of Jeni's Pumpkin Bread, which I baked into muffins plus one loaf.

It just goes to show that with a little ingenuity and a bit of hard work, you can save a lot of money!

Thursday, August 18, 2011

Delicious Lunch - Tomato Soup

I had a very tasty, surprisingly filling lunch yesterday! I had taken a chance at Kroger the other day and bought a carton of tomato soup from the organic section, and it seriously paid off. I spent about $3 on the carton of Imagine Garden Tomato Soup, compared to about $1 on the standard Campbell's Condensed Tomato Soup. Keep in mind, though, that I'll get 3-4 servings from the carton, and the can would only be 1 serving. Continuing the comparison:

Imagine
80 calories
300mg sodium
16g carbs
2g sugar
2g fiber
2g protein
15% vitamin A
30% vitamin C
2% calcium
4% iron

Campbell's
90 calories
480g sodium
20g carbs
12g sugar
1g fiber
2g protein
8% vitamin A
10% vitamin C
0% calcium
4% iron

To boost the flavor and  nutrition, I added 1/2 cup roasted red pepper puree, fresh-ground black pepper and a sprinkling of feta cheese. For the puree, I roasted two peppers in my oven until they were blackened. Immediately after removing from the oven, I covered them tightly with foil and let them steam. Then I removed the skin (it slips off pretty easily!), seeds and stems. The meat of the pepper went straight into the blender along with the juice from the steaming packet and a couple of tablespoons of water. I pureed it, pouring some into the pot with my tomato soup, some into the carton with the rest of the soup, and the remainder went into freezer containers for another time!

Thursday, August 4, 2011

Baked Chicken

Yesterday, I baked a chicken for dinner using a cool baking contraption my mom bought for me.

It works just like the "Soda Can Chicken" concept, only you can use whatever liquid you like in the middle. My favorite thing is fruit juice - orange or apple, or a blend of different citrus juices.

The chicken sits in it, like a special little chair.
I marinated the chicken this time (I don't always), in a blend of onion, garlic, rosemary, thyme, sage, salt, pepper, and apple juice. Then you just bake the little guy (gal) for about an hour at 375°, testing with a meat thermometer to make sure it's done.

The lovely part about this is that you can use the meat for your meal, then make broth with the bones! I have a pot working right now (it smells SO good!) full of my chicken bones, carrots, onion, and S&P. After simmering it for a couple of hours, I'll strain everything out, then let the broth sit in the fridge overnight. In the morning I'll skim off the fat and store the broth in the freezer.

Bonus: I only paid about $3.50 for this chicken and it will provide two meals, plus the broth for another one or two meals.

Friday, July 22, 2011

Stretching Leftovers

For dinner Thursday night, I made pork tenderloin in a simple marinade of garlic, rosemary, olive oil, balsamic vinegar, salt and pepper. It's one of my absolute favorite marinades for pork! After feeding my family, plus a friend who had come over to babysit the little ones (praise the Lord!), I had about a four-inch section of tenderloin leftover. Not much, but I rarely throw anything away! I'm glad I kept it because today I needed a simple dinner to come together quickly for Handsome and me. I ended up doing two different things.

#1: I NEVER fix sandwiches for Handsome for dinner. He eats sandwiches every single day for lunch: I know the last thing he wants to see on his dinner plate is a square of bread staring at him. But ... he had Dairy Queen and ice cream for lunch, so I bent my rule a bit. His dinner was indeed a sandwich: sliced pork tenderloin, mayonnaise, Dijon mustard, fresh spinach, and Swiss cheese. He loved it!

#2: I didn't want a sandwich. I made pasta with my portion of the pork tenderloin. I mixed angel hair pasta, spinach, olive oil, balsamic vinegar, cubed tenderloin, freshly ground black pepper and feta cheese. I loved it!

I love taking bits of leftovers and remaking them into something delicious.

Monday, July 18, 2011

Sunday Night Review

Last night I made one of my family's favorites for dinner. It's really easy to throw together, and is pretty cheap, too. The recipe makes a full 9 x 13 dish and I fed 10 with it - even have a bit leftover for lunch today! I also made my standard focaccia recipe. All in all, a hearty cheap meal that everyone likes!

Chicken Parmesan Casserole

1-26 ounce jar pasta sauce (I use my homemade stuff)
1-16 ounce box pasta (rotini, penne, shell, etc.)
3 cups cubed/shredded cooked chicken
2 cups shredded mozzarella cheese
1/4 cup Italian seasoned bread crumbs
1/4 cup Parmesan cheese
2 tablespoons butter, melted

Cook pasta according to package directions. Drain and return to pot. Stir in pasta sauce, chicken and mozzarella. Pour mixture into a greased 9 x 13 baking dish. In a small bowl, stir together bread crumbs, Parmesan and butter. Sprinkle over casserole. Bake at 375 for 25-30 minutes, until heated through and topping begins to brown.

Wednesday, June 29, 2011

Summer's Bounty

Ah, summer ... the time of year when all manner of veggies and fruits are in season! Of course, in today's world our diet can be more varied than ever before, with nearly every type of produce imaginable being available year-round. But, there's nothing like being able to get fresh, local fruits and vegetables in the summer.  The problem I find is that we can't eat it all fast enough! Often I find myself scrambling to use up that lone zucchini or the handful of grapes or the solitary kiwi before it's too late. There are lots of ways to make your produce last, though, so be proactive and plan ahead not only what recipes you'll use the produce in, but what you'll do with the leftovers.

Canning - I'm not a "canner" myself (too lazy!), but I know lots of people who are, and it's a great way to preserve summer's bounty.

Freezer Jam - A delicious, simple way to use berries and other fruits. My favorite is Strawberry Freezer Jam.

Creative Salads - "Lettuce, tomato, cucumbers and Ranch" doesn't have to be where your salad ideas end! Think outside the box with different combinations of veggies, fruits and dressings.

Smoothies - A great way to use up not only fruits, but vegetables, too!

Freezing -  The link I've provided leads to a really comprehensive site on freezing all kinds of produce! It's a good site, overall, too, and is the same one I recommended for canning.

I hope these suggestions help you make the most of the beautiful, delicious abundance of summer!

Monday, November 8, 2010

Plan Ahead for the Holidays

This post is a bit of a departure from my usual, but Shutterfly is running a wonderful promotion right now. Their collection of holiday photo and greeting cards are on sale, so it's a great time to take a look at what's available. Many people send out Christmas cards every year and Shutterfly has some that are absolutely beautiful!

I love the modern, yet classic look of this card. It's a major plus to be able to use five different pictures on the card, too, since I have such a hard time narrowing it down to just one or two. 
Brown and blue ... a gorgeous color combination any time of year!
 
This is a terrific think-outside-the-box option:


I saved my favorite for last! You could use these cards to send invitations to your family and friends for Thanksgiving dinner, a fall party or change the text to share your favorite holiday recipe!


Shutterfly is so excited about their 2010 holiday card collection that they're offering 50 free cards to bloggers who share about the promotion on their blogs! If you'd like to take advantage of the offer, too, feel free to register your blog.

Thursday, October 21, 2010

Making Every Penny Count -- Leftovers

I know you've seen it here before, but leftovers are your friend! I saw an article on-line yesterday that said the average American family throws away $600 worth of food every year. I don't know how they came to that figure, but I bet it's fairly accurate. And it's very true that one way of "saving" money is not to waste what you've bought with it. Here are a few ways I do it:

1. I buy only what I'll use or can store. For example, I'll stock on meat when it's on sale because I can freeze it. Other things aren't worth stocking up on because we won't use them before they go bad, like potatoes or other fresh veggies that don't freeze well. I take careful stock of what I have in my freezer/fridge/pantry before shopping so I don't overbuy.

2. I save my leftovers. Just last night I made spaghetti using hamburger patties I'd stored raw in the freezer. Leftover meatloaf can be repurposed in the same way. Most meats can be diced and frozen for later use in soups, sauces or casseroles. Leftover corn and mashed potatoes make wonderful fritters or "cakes", as well as corn chowder. Most leftover casseroles freeze well, and you can portion those out for your Sweetie's lunch, or your own.Vegetables can be saved for soups and casseroles, as well as omelets or quiches.

3. Small family? Make the recipe for a 9x13 dish but divide it into two 8 or 9 inch square dishes. Line one of the dishes with foil, then freeze it for later. Once it's frozen, you can remove it from the dish and wrap it well with foil, label it and save it for another day -- for your family or a family in need.

4. Fresh vegetables need not languish in your drawer until you throw them away! Many of them freeze just fine, especially if you cook them first. Check your drawer often and if you won't use it that week for a meal, go ahead and prep it for the freezer.

Friday, October 8, 2010

Making Every Penny Count -- Analyzing Recipes

Here are a few tips for making the most of your favorite recipes as well as new ones you'd like to try. Note: some of these suggestions definitely mean more work for you. If you're serious about cutting the family grocery budget, though, sacrifices must be made!

1. Does the recipe have elements that can be homemade instead of purchased? Some examples are breads, sauces, and seasoning mixes. If you have a bread machine you can make the bread you need for a small percentage of the cost of bakery breads. Sauces are better tasting and healthier when made from scratch, not to mention cheaper! Seasoning mixes tend to be mostly salt combined with common spices/herbs you already have in your spice cabinet. Try making your own, tailoring it to your family's taste.

2. Can you exchange an expensive ingredient for something cheaper? Can you leave it out altogether? One example is pancetta/proscuitto. Many Italian recipes call for these meats, but bacon/ham are much cheaper. Another alternative is going meat-free on recipes now and then. Meats tend to be expensive, so take a look at the casserole or soup or pasta dish you're making and decide if you can "beef-up" the vegetables and leave out the meat!

3. On the subject of vegetables, be sure to assess your family's favorites to find out if they're cheaper frozen, canned or fresh. In general vegetables are best for you fresh, followed by frozen, then canned. In terms of expense, it's worth it in my opinion to buy fresh even though it may cost more, depending on the vegetable. Frozen veggies are often on sale where I shop. Of course, buy what your family will eat, too! If they love green beans from the can but won't eat them fresh, by all means buy them canned -- in the reduced-sodium variety if you can find it.

I'll have more tips for you another day, but in the meantime I hope these help you to save money when you can!

Thursday, September 30, 2010

Making Every Penny Count -- Slowcooker Chicken

My grocery store rotates what meats are on sale each week. As I'm shopping for what's on my grocery list, I always keep my eye out for the sales. Chicken is one thing that is expensive at full price, but goes on great sales. That's when I snap it up! Occasionally I put the packages in the freezer for later; more often I fire up my Crockpot.

I layer aromatic veggies, seasonings and the chicken together in the slow cooker and several hours later I have chicken fully cooked, ready to be shredded and placed in the freezer.

3-4 pounds chicken (I prefer bone-in, skin-on and a mix of dark and white meats)
1 onion, peeled and quartered
handful of baby carrots
a few celery ribs with leaves, cut into 3 inch sections
2 garlic cloves, peeled and smashed
salt and pepper to taste
1-2 cups of water/chicken broth
(seasoning of your choice, optional)

All this just goes in the slow cooker for  6-8 hours. Boneless, skinless breasts will cook faster and will require the use of low-sodium chicken broth instead of water. Depending on what I'll be using the chicken for, I sometimes add lemon-pepper seasoning or herbs, but mostly I just use S&P since the chicken is going in the freezer to use at a later date.

Once the chicken is cool enough to handle, de-bone it and shred it (or dice it) placing it in quart-sized freezer bags. Don't forget to label the bags with the contents and date! Allow the chicken to cool fully before placing the bags flat in the freezer. Keeping them flat makes for easier storage and faster thawing when it's time to use them.

Finally, you'll want to strain your broth and reserve that, too. Make sure it's cool, then pour it into labelled freezer bags and freeze it flat. 

Monday, September 27, 2010

Making Every Penny Count

How many times have you stood in your kitchen staring into space, hoping a dinner menu will just appear out of nowhere? That you'll open the fridge and your dinner will be sitting on the top shelf just waiting to be popped into the oven. Well, that's probably never going to happen! But with a little planning ahead of time, it could come pretty close. I get asked a lot how to save money on meals, and how to pull it all together. This series of posts will be about how to do just that.

The key to making inexpensive, quick meals is two-part. First, you need to keep a stock of staples handy in your fridge, pantry, and freezer.  Two, you need to know how to use them! You can click on each of those words to see lists of what I keep stocked, but you'll need to adapt the list to your family's needs/tastes and your cooking style. Staples are generally inexpensive items that are the building blocks you use to make a healthy, tasty meal for your family. If your fridge, pantry and freezer are well-stocked you'll always know what you have and you won't be tempted to say, "Oh, I don't know what to have. We'll just go out to dinner tonight." Planning out several meals you'd like to make each week will save you time and money. If you know what you're going to make that week when you head to the grocery store, you're less likely to be tempted to make impulse purchases that you won't use anyway! That saves you money. I've shown you how I make my grocery list, and that's the process I go through each week. I write down main dishes, the side dishes to go with them, treats ... everything I'm planning to serve over the next several days. I don't buy anything I don't need, and I come home having everything I do need. (Usually!) That saves me time since I don't have to make anymore trips to the store later.

Friday, September 17, 2010

Empty Fridge

One reason I'm good at repurposing leftovers and making the most of what I have on-hand is that I can't afford to buy whatever I want and then be wasteful with it. My budget each week for groceries and household items (cleaning supplies, paper products, toiletries) is pretty skinny compared to what I'm sure a lot of people spend, yet it's more than some have to work with. I make all our cleaning supplies (laundry detergent, all-purpose cleaner, dishwasher detergent, fabric softener, bathroom cleaner, etc.) and I use the cheapest quality brands I can for everything. I won't sacrifice quality for price if I don't have to! I trim from other areas in order to shop at a quality grocery store that I know will provide good, lasting, beautiful produce -- combined with great customer service. I use coupons, though I'm definitely not an expert.

But the purpose of this post is to show you what you can do with a little. I have the perfect example for you. This picture of my fridge is typical of what I have to work with by Thursday. (Grocery Day is Friday.)
Top shelf: applesauce, grits, corn on the cob
Drawers: deli meat, cheddar cheese, Laughing Cow cheese, 1 egg, 1 cheese stick, 2 sticks butter
Middle shelf: Mmm ... nothing!
Bottom shelf: whole wheat flour, 1% milk, BBQ sauce
Drawers: apples, lemon, spinach, green onions, 2 carrots

It's not too bad, though, because I do have more stuff in the door:
Pretty much all condiments, more butter, chicken broth, peaches.

It may look hopeless ... and it's certainly not inspiring, but right now it's just not in our budget to be able to bat my eyelashes at Sweetie and ask him to take us out to dinner. He would if he could, but he can't, so we won't! It just so happens that this sort of thing gets my creative cooking juices flowing!

Dinner last night was corn chowder with rolls. I'll post the recipe another time, but here's how it came together with my meager supplies ...


Cream: leftover from a cake on Monday
Cheddar: staple
Butter: staple
Garlic: staple
Corn: leftover
Broth: staple/leftover
Potatoes: staple
Green Onions: leftover
Carrots: leftover/staple
Prosciutto: freezer (bought on sale for $3.99/lb!)
Rolls: leftover (dough from the freezer)

Tuesday, September 14, 2010

Leftovers for Lunch

For Sunday lunch this week, I made soft tacos. They're fast and easy which meant that within 30 minutes after getting home we were sitting at the table eating. Along with store-bought tortillas, I served up a pound of ground beef with seasonings, rice, corn, shredded cheese, sour cream, and salsa. (I usually have lettuce, too, but tacos were a last minute addition to the list after we'd already left the produce section.)

One great thing about these is that I can hide stuff in them that the kids won't normally eat. If I put rice and corn on a plate in front of The Boy, he wouldn't touch it. But if I roll it up in a tortilla, he'll eat every bite! I hide beans this way, too. At any rate, my kids love Mexican-style food.

After we finished lunch on Sunday, I simply piled all the leftover rice, corn and beef into one storage container. At this point, I could have put it in the freezer for another time, but I had a feeling we'd need it soon and into the fridge it went. Monday, I plopped the contents of the container into a pot and reheated it all together. I added a bit more seasoning (chili powder, salt and pepper) and salsa. (See how I snuck the salsa in there without the kids knowing? I'm good like that!) I was out of tortillas, so I whipped up a batch from scratch -- they're not nearly as hard as you might think! Lunch was ready in less than 30 minutes since all I had to do was make the tortillas, reheat the filling, and get the toppings from the fridge.

Amazingly, there was enough filling leftover that I can use it for yet another meal! And we didn't skimp on eating, either, I'm here to tell you. The first meal, my sweetie had three tacos and the kids and I each had two. The second meal, we each had two and were full since the homemade tortillas are so much more filling. It's really pretty cool how far leftovers from a meal can stretch when you get creative!


Homemade Taco Seasoning
1 pound lean ground beef (93%)
1/2 onion, chopped
2 cloves garlic, chopped
3 teaspoons chili powder (more or less to taste)
1 teaspoon cumin
1/2 teaspoon fresh-ground black pepper
1/2 teaspoon salt

Brown the ground beef with the onion and garlic. Stir in chili powder, cumin, pepper and salt. Cook for a few minutes longer. This freezes really well so don't be afraid to double it if you've got enough beef.