Showing posts with label breakfast. Show all posts

Tuesday, September 13, 2016

Green Smoothies

Green smoothies are all the rage right now, and it's easy to see why! They're packed with nutrition, taste fantastic, and are ridiculously easy to make. I have one for breakfast nearly every day. My morning routine is pretty consistent: wake up, drink a glass of water while standing at the sink, followed by coffee (with half and half and maybe 1/4 teaspoon brown sugar). Then in the mid-morning, around 9, I have a green smoothie. There are lots of different combinations of fruits and veggies you can use in them, and I'll share my favorites here. It's really more about a method than a recipe, per se.

Using plastic wrap, I bundle up the fruit I want to use into little packets. Several of those fit in a quart freezer bag. I like to make a few different combinations and keep them in separate, labeled bags. If you make all the same kind it's easier to put them all in a gallon-size freezer bag. When you want to make a smoothie, you have a couple of options. 1) Place the packet in the microwave for 15 seconds at half power or 2) Let it sit out on the counter for 5-10 minutes. This softens the fruit just enough to make it easier to pack into the blender cup. I place the fruit/veggies in a blender cup and add just enough orange juice or almond milk to come up halfway. Blend until smooth; drink up! The amount of liquid will vary a little depending on the fruit you used and how frozen solid it is.

(Generally, I freeze only fruit in the little bundles. I keep a bag of frozen kale and a bag of fresh spinach on-hand to add into the smoothies. To freeze kale, wash and dry it well, then place in a freezer bag. Remove every ounce of air and seal. Toss in the freezer. I have been told you can freeze spinach like this, too, but I haven't done it.)

Kitchen Sink smoothie, before adding OJ and blending.
Green Sunshine
pineapple
banana
mango
spinach
kale
OJ

Berry Blend
assorted berries: strawberry, blueberry, raspberry, blackberry
banana
spinach
kale
almond milk or OJ

Simple Green
banana
mango
strawberries
spinach
kale
OJ

Kitchen Sink
banana
pineapple
blueberries
strawberries
mango
spinach
kale
almond milk or OJ

Thursday, June 6, 2013

Pomegranate-Strawberry Smoothie

I'm sharing someone else's recipe today ... my Oldest Girl's! She loves to experiment with smoothies for breakfast or snacks. She also has developed a real love for pomegranate. This is one of her favorite smoothie recipes:

Pomegranate-Strawberry Smoothie

2 containers (5.3 oz each) pomegranate Greek yogurt
1/2 cup frozen strawberries
1 tablespoon honey
splash of milk

Combine all ingredients in a blender and blend until smooth. Serves one!

Tuesday, November 13, 2012

Honey Vanilla Granola

My friend Leah is a creative cook with a delicious granola recipe! I've made it several times and I love having it on hand for snacking and adding to yogurt parfaits. I'm going to share with you the recipe as I generally make it, but as with most granola recipes it's extremely versatile. Use your imagination!

These are all the ingredients I used in my last batch.
Honey Vanilla Granola

1/2 cup butter
1/2 cup honey
1 tsp vanilla extract
1/2 tsp maple extract
2 tsp cinnamon
dash salt
4 cups whole oats
3/4 cup additional add-ins (shredded coconut, wheat germ, flax seed, sunflower seeds)

Preheat oven to 325°. In small saucepan melt the butter and honey together. Stir in cinnamon, vanilla, maple extract and salt until thoroughly mixed. I like to bring the mixture to a boil for one minute to be sure it is thoroughly mixed, and to help it harden as it bakes. In separate bowl, stir together oats and any add-ins. Pour butter mixture over oats and mix well. Spread coated oats in a thin even layer on a greased cookie sheet or jelly roll pan. Bake for 9-10 minutes, remove from oven and stir thoroughly. Return to the oven and bake for an additional 8-10 minutes. The granola needs to be lightly golden. It will darken and harden as it cools. You may have to adjust baking times and temperatures -- if the granola is brown, it will have a burnt taste. (I usually bake mine for about 8 minutes each time because I don't like it to be too crunchy.)

The finished product! Scrumptious.

Tuesday, September 4, 2012

Yogurt Parfaits

Sometimes, well, a lot of the times, the extra effort is definitely worth it.

(Rambling Side Note: It makes me giggle when someone misspells 'definitely' to look like 'defiantly'. I imagine they have really strong feelings about the subject and would fight you for it. "I defiantly think Star Trek is better than Star Wars." or "David Tennant is defiantly a better Doctor than Christopher Eccleston." Anyhoo ...)

When it comes to homemade, I've told you before how I feel. It's amazing how easy some things are to do, and how much cheaper they are to make from scratch.

Homemade yogurt is a good example. For the cost of a gallon of milk ($3 for me) and some cheesecloth, you can make it at home and know exactly what's in it! You can sweeten/flavor the whole batch when it's done, or do it by the serving. I like to keep it plain and flavor it by the serving so I can use the plain in place of sour cream or mayonnaise in recipes. Out of that gallon of milk, I got 3 pint jars of Greek yogurt, plus a bit more. I also got 2 quart jars (plus some) of whey. Whey is great to use in smoothies, and in place of liquid called for in yeast breads. You can also check this link for lots more uses. For the name brand of Greek yogurt (tastes better than store brand) it usually costs between $3 and $5, depending on sales and brand, for the 16 ounce container. Cheaper and better for you - I can get behind that!

This morning I made Honey-Vanilla Granola, from my friend Leah's recipe. It is so easy and delicious. It's a big batch, but it's pretty tasty so I'm not sure it's going to last long! Start to finish for me? 25 minutes. (15 of that, hands-off.)

I also threw together a strawberry sauce. I've been taking advantage of the strawberry sales this summer and buying them up. I wash, trim, and freeze them so I can use them throughout the year. The sauce was simply strawberries, a touch of sugar, and almond extract simmered together. I cooled the mixture and popped it in the blender to get it smooth.

Later, I'll layer the yogurt, granola and strawberry sauce to make parfaits for the kiddos. Purchased at the store, the parfaits are easily $1.50 apiece, and full of unpronounceable ingredients.


Thursday, August 23, 2012

Ham and Cheese Cups

I've seen recipes similar to this one over the years and they've intrigued me. Mostly, though, they involve simply cracking an egg into a muffin cup lined with ham or bacon and sometimes topping it with cheese. I am NOT a fan of the whole "runny yolk" deal, though, and I don't like eating the white and yolk separately like that unless it's a hard-boiled egg. Even then I have to have a taste of each with every bite! I'm weird like that. (But when it comes to candy bars like Kit-Kat, Reese's Cups, or Twix I eat each layer separately. Pretty sure I read an article addressing that in Psychiatry Monthly.) At any rate, the Ham and Cheese Cups I made today were fabulous! I made only 6 since I was doing them for my own lunch - plus, I happened to have 6 slices of ham leftover from Sunday night's deli sandwiches. I had a filling lunch and I'll have a nice breakfast in the morning, too!


Ham and Cheese Cups

12 slices deli ham
8 eggs
2 tablespoons Greek yogurt or sour cream
1 cup shredded cheddar cheese
2 small potatoes, washed and peeled
1 tablespoon butter
salt and pepper

Spray 12 muffin cups with non-stick cooking spray. Line with one slice of ham. In a large measuring cup or a bowl with a spout for easy pouring, crack the eggs and whisk them together with the yogurt and salt and pepper to taste.

 On a paper towel, shred the potatoes. Use the paper towel to wring out some of the moisture in the potatoes. Place shredded potato in a small microwaveable bowl and sprinkle with salt and pepper. Add the butter; microwave for about 1 minute, stirring halfway through. Divide the potato between the muffin cups and top with cheese. Pour the egg mixture evenly over each cup.


Bake at 350° for 16-20 minutes, until tops are nicely rounded and a toothpick inserted into the center comes out clean.

If I'd had spinach or broccoli or zucchini, I would have used that instead of, or in addition to, the potato. Either way these were delicious and I'll be making them again for sure!

Thursday, August 2, 2012

Breakfast Burritos

I love breakfast food! I like it best brought to me on a tray while I sip coffee in bed, but since that's never happened ... I'll take what I can get. These breakfast burritos are really wonderful. You can eat them right away, or freeze them for future use. They can be microwaved straight from the freezer! One minute and your breakfast is served. This recipe is more on the lines of assembly instructions, since you can use whatever your family likes to stuff them.

Breakfast Burritos

First, scramble some eggs! I use this basic recipe, but you make them how you like 'em:

I use about 1 egg per burrito. Five in this case. A dollop of sour cream, a splash of milk, salt and pepper.

Whisk it together really well! Then cook 'em.
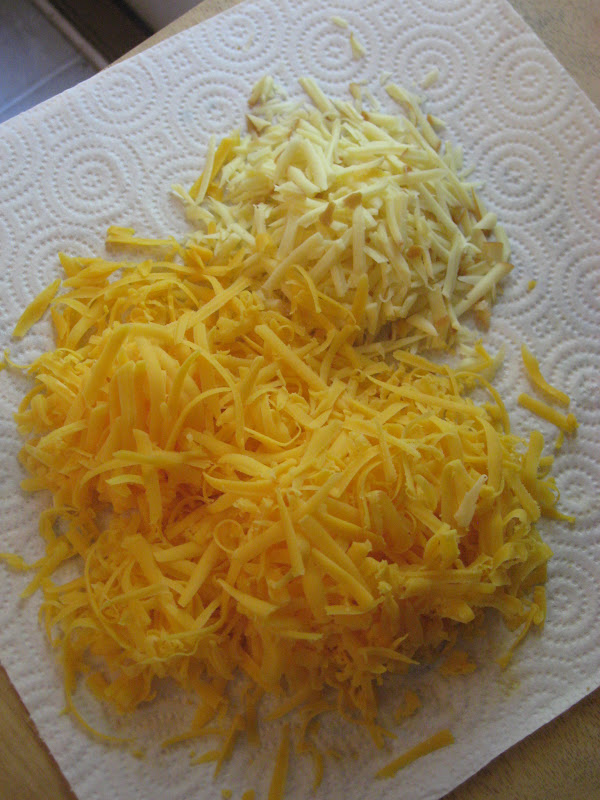
You'll need cheese, of course!

This is a mixture of gouda and sharp cheddar. I didn't use all of this - I was shredding for our dinner, too.
From this point, you can use sauteed peppers or onions; cooked bacon, sausage or ham; diced green onions; fresh herbs; anything you like in a burrito!

I used some sausage I got from my granny - It's SO good! I didn't have very much left, sadly, so I limited myself to 3 pieces per burrito.


Starting with the cheese, then eggs, layer your ingredients in the middle of the tortilla (I cup it in my hand to keep them contained), then fold them up!


Now they're ready to eat! Or, to prepare them for the freezer, wrap them in wax paper, then in aluminum foil.


If you feel sure your family will eat them fairly quickly (within a month), skip the aluminum foil and put them in freezer bags. 

To heat them, remove the foil but leave on the wax paper. Place on a plate in the microwave, and heat for 30 seconds. Flip it over, and heat for 30 more seconds. Depending on your appliance, it will probably be done at this point. If the wattage is lower (850 or less) it will need another 30-60 seconds.

Wednesday, March 21, 2012

Raisin-Vanilla Oatmeal

Our Little One is a big eater. She wakes up in the morning pointing to the kitchen! Not being a morning person, I tend to want to hand her a cereal bar or a banana and call it quits. Sometimes that's enough for her, but I do like to cook something to provide her with a heartier meal. (Side note: "Don't you have two older kids? What about them?", you may well ask. Well, it's no use. They don't like breakfast and even on special occasions when I'm cooking for Daddy they'd almost always rather have cereal than pancakes, waffles, eggs, oatmeal or grits. So they have Wheat Chex or Multigrain Cheerios and I cook for everyone else.) Anyway, back to the Little One. This morning I asked if she'd like oatmeal and her face lit up! "'Meal!" she cried, and ran to the pantry to pull on the doorknob. Here's how I make a serving for her, which would be a decent serving for an adult, too. You could bump the oats up to 1/3 cup (use 2/3 cup of water) without changing the rest of the recipe, if you wanted a bit more. Also, I use flax seeds because they're supposed to be good for lowering cholesterol - and Little One's is high due to genetics. You could leave that out or use wheat germ or whatever you like.

Raisin-Vanilla Oatmeal

1/4 cup old-fashioned oats
1/2 cup water
2 teaspoons ground flax seeds
1 teaspoon butter
pinch of salt
a few drops of vanilla
2 tablespoons raisins
a dash of cinnamon
1 tablespoon brown sugar

Combine all ingredients except cinnamon and sugar in a microwavable bowl. Cook on high for about 2 minutes - depending on your microwave. Keep an eye on it and stop to stir if needed to keep it from boiling over. Stir in the brown sugar and cinnamon. Yield: 1 serving

Don't like raisins? I have an Apple Cinnamon Oatmeal recipe that may appeal more to you.


Tuesday, March 20, 2012

Cinnamon Toast

So all three of our little darlings were up by 5 this morning. Handsome and I were so glad to see them we didn't mind at all! Not. We love those little boogers, but we love them more later in the morning. Anyway, since I was up, I brewed a pot of coffee, fixed Handsome's turkey sandwich for his lunch, and made a batch of cinnamon toast.

When I was grocery shopping Friday, I picked up a loaf of Italian bread that was on sale for $0.79. Considering that will make two batches of toast I thought it was a pretty great deal! Here's the recipe for how we like it:

Cinnamon Toast

4 tablespoons butter, softened
1 teaspoon white sugar
3 tablespoons brown sugar
1/2 teaspoon ground cinnamon
8 slices Italian bread

In a small bowl, stir together the first four ingredients until well combined. Spread this evenly, all the way to the edges, onto the bread slices. Place the slices on a foil-lined baking sheet. Set your broiler to 475° and make sure your oven rack is near the top. Broil the bread for just a few minutes - you want the butter/sugar to caramelize, but not burn. Watch it carefully!

I like that the edges are crispy and the topping has a little crunch to it, but the rest of the bread is soft and perfectly warmed through. Even if we owned a toaster I would still make it this way!

Before ...

... and after!

Wednesday, March 7, 2012

Homemade Yogurt

My kids all love yogurt, but I limit the amount they eat simply because it gets expensive. Several weeks ago I found a blog post on how to make yogurt at home in the slow cooker and I have finally accomplished it! It turned out really well. Though it takes time to go through the process, it's not a lot of "hands-on" time and I found it to be pretty simple. I used a half-gallon of organic 1% milk this time, but since it turned out so well, I'll do a full gallon next time. The higher the fat content in your milk, the creamier your yogurt will be, but since I have a toddler with (genetically) high cholesterol we went with the lower fat and it worked just fine.


If you'd like to try it, too, just check out this link!

Saturday, January 7, 2012

Maple Bacon Cupcakes

This seems to be such a popular combination of flavors these days! After tasting it, it's not hard to see why. In my opinion it tastes like Saturday morning breakfast - just eat one with a cup of coffee! For you skeptics out there, they really do taste like pancakes with syrup, and bacon on the side. I asked our college people what they thought and I got really good reviews - and a lot of surprise that they were actually tasty! Try 'em today!


Maple Bacon Cupcakes:
  
1/3 cup butter, softened 
1/3 cup bacon fat, firm (refrigerated)
1-1/2 cups brown sugar 
2 eggs 
1 teaspoon maple extract 
2-1/2 cups all-purpose flour 
2-1/2 teaspoons baking powder 
1/2 teaspoon salt 
1 cup milk
6 slices bacon, cooked and crumbled 

 In a large bowl, cream butter, bacon fat and sugar until light and fluffy. Add eggs, one at a time, beating well after each addition. Beat in maple. Combine the flour, baking powder and salt; add to the creamed mixture alternately with milk. Fold in bacon pieces. (Do not over-mix.) Fill paper-lined muffin cups three-fourths full. Bake at 350° for 18-20 minutes or until a toothpick inserted near the center comes out clean. Cool for 10 minutes before removing from pans to wire racks to cool completely. Frost cupcakes. Yield: 18 cupcakes

Maple Bacon Frosting:

5 tablespoons butter, softened
3 tablespoons bacon fat, firm (refrigerated)
4 cups powdered sugar
1/2 teaspoon maple extract
3-4 tablespoons milk

In a bowl, cream butter and bacon fat. Beat in sugar and maple. Add in enough milk to reach your desired consistency.

Note: I definitely recommend using cupcake liners with these, and they're best served fresh. They have to be refrigerated, and in my opinion aren't as good cold. Bring them up to room temperature before serving if they've been refrigerated. 

Thursday, January 5, 2012

Cottage Cheese

I know, most of you cringed at the title of this post! I don't like the stuff either! But my girls love it and always have. It was a great transitional food for them when they were getting used to chunkier baby foods. It has tons of protein, which is good for when stronger tasting protein-rich foods aren't so palatable to baby. They like it now with a touch of caramel sauce or blended with fruit. At any rate, I did some research on how to make my own since it can be kind of expensive - especially considering how much the girls love it! It's slightly cheaper to make it, and though I won't do it all the time it was a fun experiment. I used Alton Brown's recipe, followed it exactly, and it turned out perfectly! The only slight modification I made was to mix the finished cheese with whole milk instead of half and half or cream.

My Oldest Girl says it's no Breakstone's, though! Oh, well.

Friday, September 23, 2011

Ginger-Lemon Pear Freezer Jam

A couple of weeks ago, we went to dinner at the home of some delightful friends. The lady of the house had spent the best part of the day canning pears and she served some of the fruits of her labor with us at the table. One special touch she'd added to her canning recipe was to use ginger and lemon, and the pears were lovely! She send me home with a large bag of pears so I could make some freezer jam. Already, I was feeling inspired to try out the combination of ginger and lemon!


Ginger-Lemon Pear Freezer Jam

6 cups crushed pears (peel, core, and pulse in food processor - do not pureé)
4 cups sugar
Juice and peel from one lemon
1-inch piece of ginger, peeled and grated (use a microplane, or chop finely)
1.75 ounce packet low-sugar pectin
1 teaspoon vanilla extract

Place pear, lemon juice and peel, vanilla and ginger in a stock pot. Stir in pectin. Place pan over high heat; bring to a boil. Stir in sugar; cook 5 minutes or until sugar dissolves. Bring to a boil; cook for 1 minute, stirring constantly. Remove from heat. Skim foam from surface; discard. Stir 5 minutes to ensure fruit is suspended in jam. Divide jam into jars, seal, and allow to come to room temperature. (Not more than 24 hours.) Store in refrigerator for 3 weeks or in the freezer for 12 - 18 months.


Wednesday, September 7, 2011

Bored With Breakfast?

I've done a few posts in the past on how to make baked goods better for you by boosting their nutritional content, but this morning I thought I'd encourage you to change things up if the kids (or you) are bored with the same old thing. It's amazing how a little change can make something taste so different.

Pancakes are such an easy breakfast! I don't make them often because my kids prefer cereal over most everything else, but I like to have them once in a while anyway. I rarely make plain pancakes, but prefer to add different flours and flavor combinations. This morning I used a recipe from Simple & Delicious with cornmeal (it adds such delicious sweetness!) and whole wheat flour and served the pancakes with Honey-Cinnamon Butter instead of syrup. All three kids loved them! The Boy rated them a 100 on a scale of 1 to 10.

(Note: The link for Simple & Delicious is just to their site, not for the recipe, since it's a new one and therefore "subscriber-only")

Friday, September 2, 2011

Apple-Cinnamon Rolls

Since Handsome was going to be home Friday, I decided Thursday night to set up some cinnamon rolls for baking as a breakfast treat. Since Handsome loves all things apple, I decided to try an experiment with said cinnamon rolls. I made my standard recipe, but also sprinkled diced apples on the dough after the cinnamon, sugars, and pecans. I then proceeded as usual.

My friends, they were divine!

Thursday, August 25, 2011

Apple-Carrot Muffins

Apple-Carrot Muffins

1 cup all-purpose flour
1-1/3 cups whole wheat flour
1 cup quick-cooking oats
1 cup old-fashioned oats
2 Tablespoons baking powder
1 teaspoon baking soda
2 teaspoons cinnamon
1 cup brown sugar

1/2 cup milk
1/2 cup unsweetened apple juice
2 eggs
2/3 cup melted butter
1/2 cup unsweetened applesauce
2 teaspoons vanilla extract
1-1/2 cups finely shredded carrots
1 Granny Smith apple, peeled and shredded.

In a large bowl, stir together the dry ingredients until well blended. In a separate bowl, combine the wet ingredients, including carrots and apple. Add the wet to the dry, stirring just until everything comes together. (If you overstir, your muffins will be tough.) Fill greased or lined muffins cups 3/4 full. Bake at 375 for 18-20 minutes, or until a toothpick comes out clean. Allow the muffins to cool slightly before removing to a wire rack. Yield: 2 dozen muffins

Monday, August 22, 2011

Sunday Night Review 8/21

Every once in a while, I love to make breakfast for supper. It's my favorite meal, mainly because it doesn't generally include any vegetables! It tends to be my go-to meal when the cupboards are otherwise bare. Of course, I much prefer to plan ahead and actually make a really good breakfast menu! That's what I did for this past Sunday night. I never know ahead of time how many "college people" are going to show up from week to week, and breakfast usually stretches pretty easily. We had the most people I think we've ever had this time, with 20! Add our kids into the mix, and you know we had a packed house.

Here's the menu:

Hashbrown Casserole
*Brown Sugar Bacon (one of the college guys has dubbed it THE Bacon and that name has stuck!)
Grits
*Scrambled Eggs
Sausage
Cinnamon Rolls (2 pans, 32 rolls. Half with pecans, half without.)
**Apple-Carrot Muffins (These were just leftover from a Saturday baking session.)

I figure everyone has a recipe for Hashbrown Casserole, but I'll share mine with you here, anyway! It's really simple, and one of my favorite dishes.

Hashbrown Casserole
1 package frozen Southern-style hashbrowns
1 can (10-3/4 oz.) cream of chicken soup
8 ounces sour cream
8 ounces shredded sharp cheddar cheese
4 tablespoons butter, melted
Salt and pepper to taste

Stir all ingredients together in a large bowl. Pour into a greased 9 x 13 baking dish. Bake at 350 for 45-50 minutes, until bubbly and cheese is completely melted.

* These recipes are in my cookbook, but I haven't shared them on the blog yet.
** I'll share this recipe soon, in another post.

Friday, June 10, 2011

Fried Grits

I have many food-related memories of my dad - Rocky Road and Butter Pecan ice cream. The year he bought me mint chocolate chip Hubba Bubba bubble gum for my birthday. Banana Popsicles. The story of how he told Mom he could eat fried chicken every night for dinner and be a happy man, and Mom did it. For, like, a week.

I also have a few memories of my daddy's cooking. Mom was the one who baked the bread and fried the chicken on a regular basis, but now and then Dad would whip out his specialties. For some reason, his double-decker-crunchy-peanut-butter-on-whole-wheat-sandwich was SO good. And he was the "grill sergeant", laying out on a lounge chair wearing cutoffs with a hat pulled down over his eyes, a spatula hanging loosely at his side, ready to pry the perfect burgers off of our little Weber. But one of my favorite memories is Fried Grits. Yes, you may be skeptical at this point, but you must trust me. Fried Grits are divine.

They have to be started the day/night before. Essentially, you just put leftover grits in a plastic container in the fridge until  the next day. It's best to make sure they are firmly in the corners and grooves of your container.  They will turn into a beautiful grit-brick.

Grits, sharp knife, butter.
Slice the grit-brick thinly (I usually cut it in half, then slice) while you are heating a skillet with a couple tablespoons of butter thrown in. Lay the slices in the hot skillet, being very careful.

 When they have begun to brown (4-5 minutes), carefully flip them over to the other side. Grits will pop out at you! Dad kept a mesh screen thingy over the grits to minimize that occurrence. I slide the skillet off the burner to flip them and that helps a lot.

This is just after I flipped them onto the second side. Aren't they pretty?

... because I know you wanted a close-up.
 Cook them for another 2-3 minutes on the second side, then slide them onto a plate. Lather, rinse, repeat. Well, slice, butter, repeat, anyway.
All done!

Wednesday, May 18, 2011

Potato-Spinach Quiche

I've pretty much never met a quiche I didn't like but Handsome subscribes to the theory that real men don't eat quiche. Since I know plenty of real men that DO eat quiche, I've tried to change his mind with various recipes with no luck. So, I've resigned myself to making it just for my lunch. I'm not complaining though, because it just means more for me! Little One loves it, too and I do share with her - if she catches me eating it!

Here's a recipe I developed using whatever sounded good from my pantry:

Potato-Spinach Quiche
1 tablespoon butter
1 green onion, chopped or 1/4 cup chopped white onion
2 red potatoes, finely diced
2 cups fresh spinach, chopped
4 ounces deli ham, chopped
6 ounces cheddar cheese, shredded
salt and pepper
5 eggs
1/4 cup milk
1/4 cup sour cream

In a skillet, saute onion and potato in butter until potatoes begin to get tender (8-10 minutes), seasoning as they cook. Add ham and spinach. Cook until spinach is wilted and ham begins to take on color. Pour mixture into a greased pie plate. Top with cheese. In a mixing bowl, combine eggs, milk, and sour cream. Season lightly. Pour over mixture in pie plate. Bake at 400 for 10 minutes. Reduce heat to 350 and bake for another 20-25 minutes. Let stand for 5 minutes before serving.

I made this yesterday for my lunch and just had it again for breakfast. Between that and sharing with Little One, there's only one piece left! Yum!

Tuesday, May 17, 2011

Strawberry Freezer Jam

Me. Our Oldest Girl took this picture.

Our family went to a strawberry field recently to pick our own berries. The last time we did that was three years ago, but we've wanted to go back ever since. I made strawberry freezer jam then, and I really wanted to try my hand at it again. I tweaked a recipe I found, reducing the sugar and adding a bit more flavor. I like my strawberries finely mashed, but if you like yours to be chunkier, go for it! Just add about a 1/2 cup of water to the strawberry mixture before you add the pectin. (If your berries are finely mashed the jam will be thinner than the traditional texture you're used to.)

Strawberry Freezer Jam


2 quarts fresh strawberries
4 cups sugar
3/4 cup light corn syrup
2 tablespoons lemon juice
2 tablespoons lime juice
1 package (1-3/4 ounces) powdered fruit pectin for low-sugar recipes

Wash, stem and mash the berries, measuring out enough mashed berries to make 4 cups; place in a large stewpot. Stir in the sugar, corn syrup, lime juice and lemon juice. Let stand for 10 minutes. Stir in pectin. Bring to a full rolling boil over high heat, stirring constantly. Boil for 1 minute, stirring constantly. Remove from the heat; skim off foam. Pour into jars or freezer containers, leaving 1/2-in. headspace. Cover and let stand overnight or until set, but not longer than 24 hours. Refrigerate for up to 3 weeks or freeze for up to 1 year. Yield: 4-1/2 pints.

Our Little One

Friday, May 6, 2011

Cinnamon Rolls

Cinnamon Rolls

3 cups flour, divided
1/4 cup sugar
1 package (1/4 ounce) or 2-1/4 teaspoons yeast
1/2 teaspoon salt
1/2 cup milk
1/2 cup (1 stick) butter
1/4 cup apple juice
1 egg

Combine 2 cups flour, sugar, yeast, and salt. In a small saucepan, heat milk, juice and butter to 120-130 degrees. Add to dry mixture just until moistened. Add in egg and 1 more cup flour. Mix until smooth and the dough forms a ball. Cover and let rest for 10 minutes.

Roll the dough out on a lightly floured surface, into a rectangle approximately 1/4 inch thick. Top the dough with:

4 tablespoons butter, softened
3 tablespoons brown sugar
3 tablespoons white sugar
2 teaspoons cinnamon
1/2 cup nuts, optional

Roll up, starting with the long side. Using a sharp knife, cut the dough into 16 slices. (I cut it half, fourths, eighths, then sixteenths!) Place the rolls into a greased 9 x 13 dish and cover with plastic wrap. Let rise on the counter for 45 minutes, or until doubled. You can also place them in the fridge until you're ready to bake. Just let them rise on the counter before popping them in the oven. Either way, bake them at 350 for 18-22 minutes. While still warm, top with the icing:

2 cups powdered sugar 
1/2 teaspoon maple extract
2 tablespoons milk 
2 tablespoons melted or softened butter 
3 tablespoons brewed coffee 


Stir all ingredients together until smooth.